|
|
PhoneLog Pro Help |
(For Version 3)
PhoneLog Pro helps you store details about phone calls you have made or received — who you called, when you called and what was said on the call etc. This is particularly useful when you have conversations with utility companies, financial institutions or anyone else where you need to keep a quick record of the conversation. It's also great if you work in a small business and need to take notes of callers so that you or other people can get back to them later.
It works with the apps you already have on your Mac — you can retrieve information from your Contacts or Address Book, store events in your Calendar and add Reminders to call people back. It provides Spotlight searching to find the exact call you're looking for, even when PhoneLog Pro isn't running, and a timer so you can keep track of how long you've been on the call.
If you have multiple Macs you can set them up to synchronize your call log between them (great for admin assistants and their bosses) and if you have iPhones or iPads you can keep them in sync too using the new PhoneLog app for iPhone and iPad.
Version 3 is a major upgrade and has many new features including:
Click here to learn how to use the extra features.
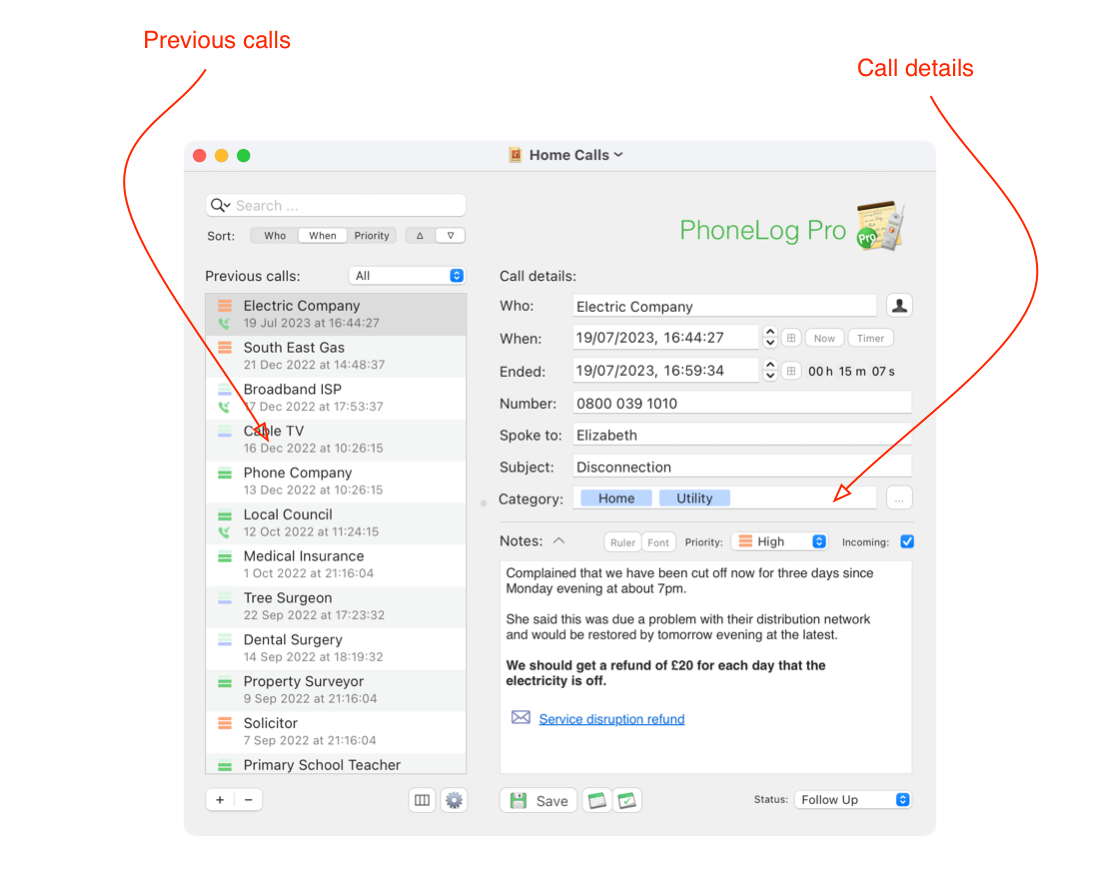
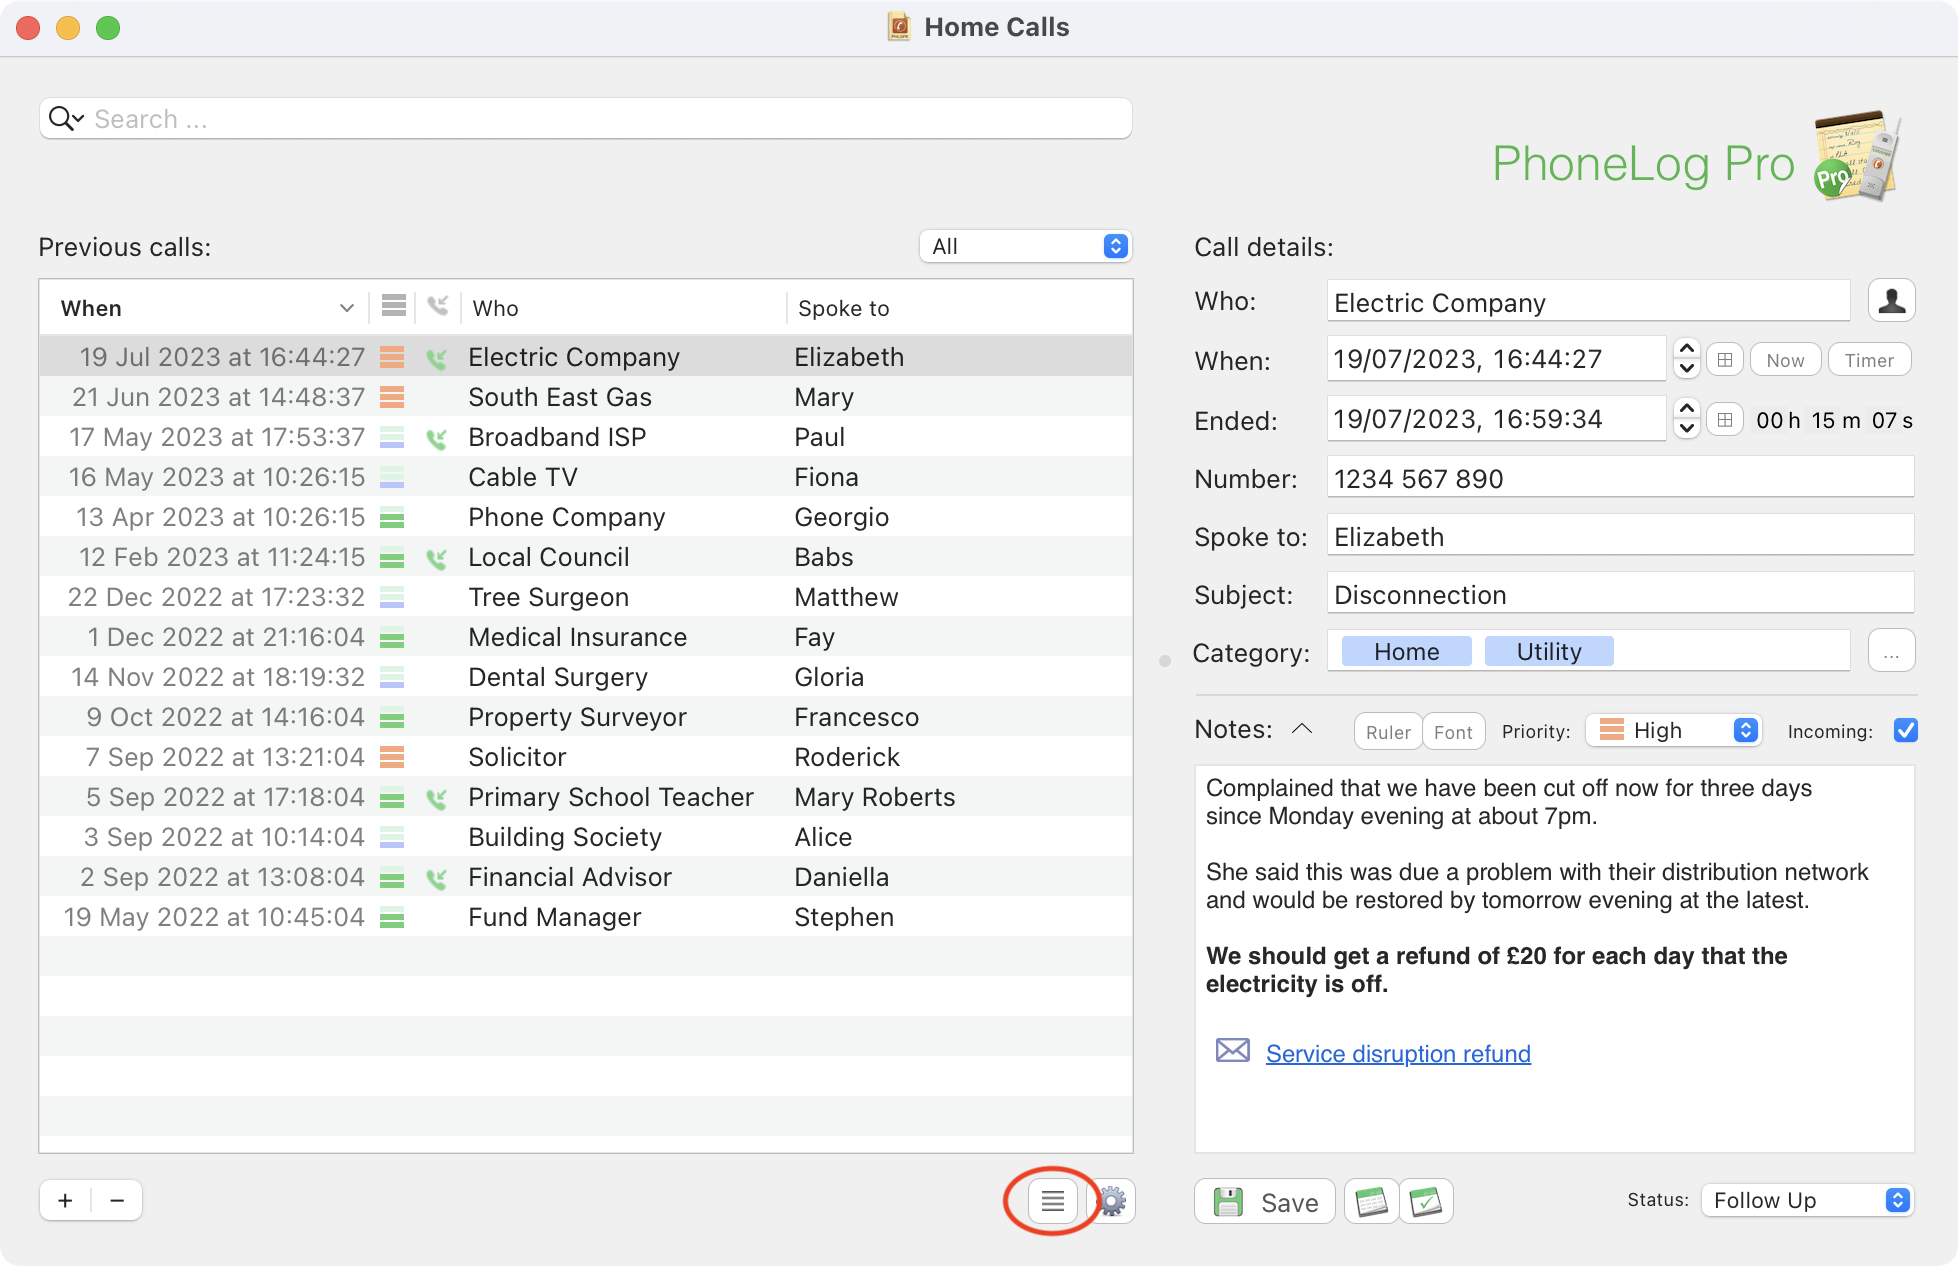
The list of previous calls appears on the left and detail about the particular call that is selected appears on the right. The fields on the right are editable.
PhoneLog Pro will open with a new blank log window the first time you use it. You can start straight away entering new calls into this existing log or you can create new logs anytime by choosing "New Call Log" from the File menu (or by pressing Command-Shift-N). You can have separate call logs for different purposes — each log will be opened in a separate window. For example you could have a log for calls made for Household purposes, another for Work calls and another for Financial calls. Just save each with a different name.
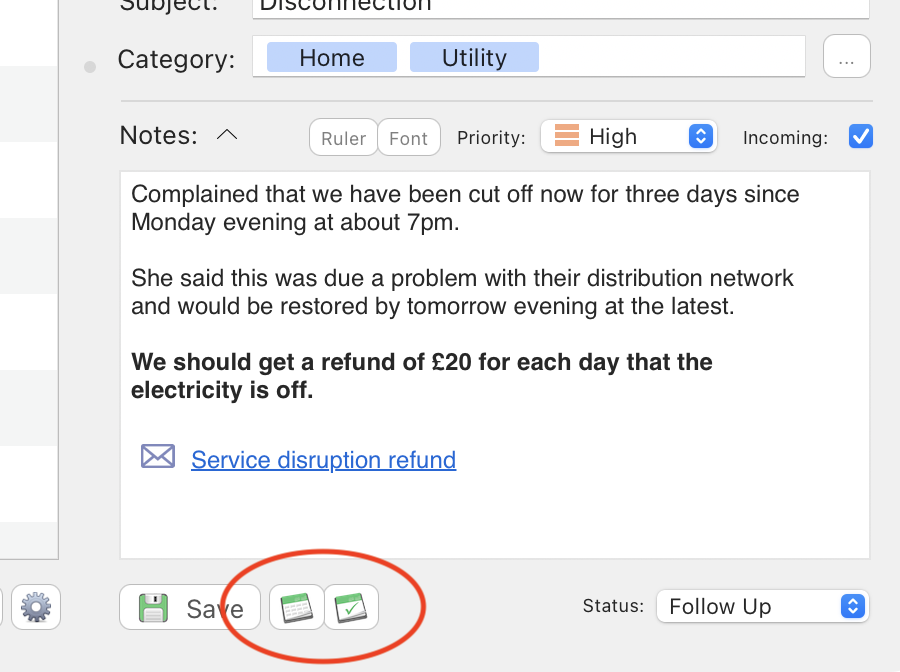
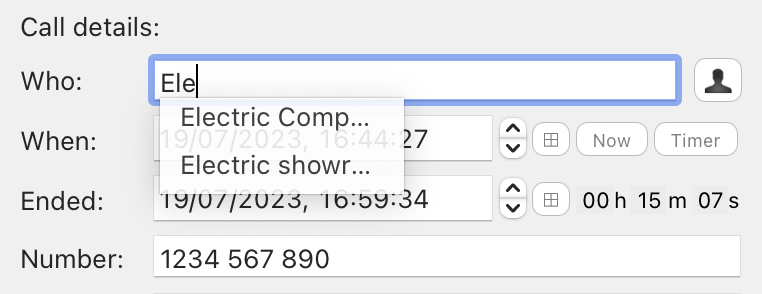
To create a record of a new call you have made, press the "+" button under the list of calls (or press Command-N) and start typing in the fields on the right hand side:
| Who: | The person or company you had a conversation with. |
| When: | When the call took place. You can press the "Now" button to set the time to now. |
| Number: | The phone number you dialled. |
| Spoke to: | The person you spoke to - eg the call centre operator. |
| Subject: | The subject discussed on the call. |
| Category: |
Any category(s) you would like to assign to the call.
(These are user-defined — see here.) |
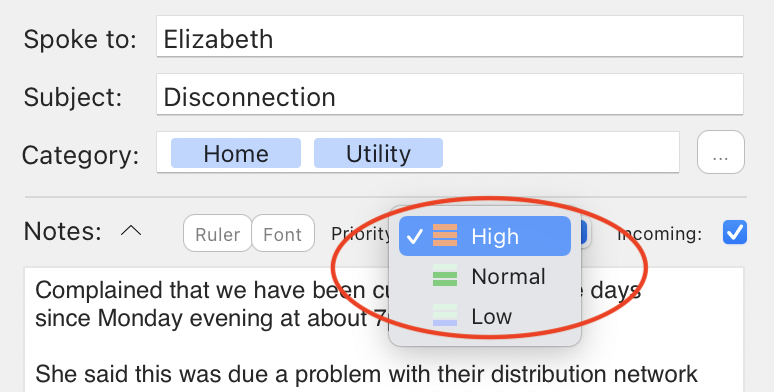
| Priority: | Choose from the dropdown list of High, Normal or Low. |
| Incoming: | Check this box if the call is incoming rather than outgoing. |
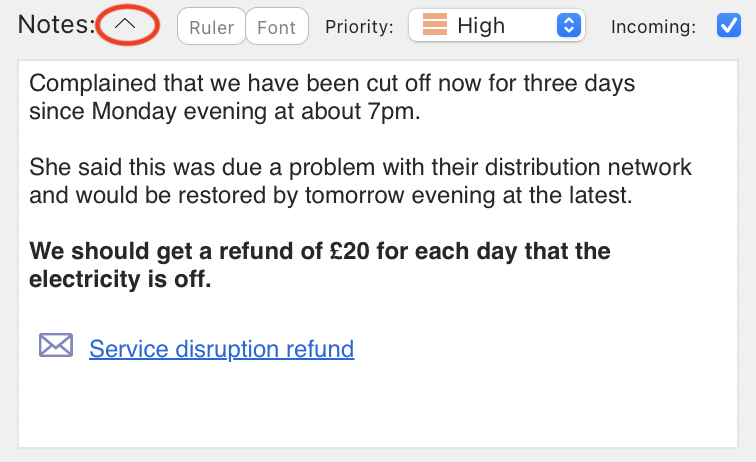
| Notes: | Any notes you wish to record - eg what was said, what needs to be followed up etc. |
| Status: |
The status for the call - eg On Hold, Follow Up, Closed etc.
(These are user-defined — see here.) |
Press the "Save" button at the bottom of the window to make sure the data has been saved.
Select the call that you want to delete in the left hand side and click the "Delete" button (or press the backspace key on the keyboard). Make sure to choose "Save" to make the deletion permanent.
You can use the search box at the top left of the window for finding particular calls. It will find calls if the text matches in any of the fields. So even if the text is mentioned deep in the notes field the call is returned as matching.
Click on the magnifying glass in the search box to show a drop down menu where you can choose to restrict your search to just the Categories in a call and not the full text. See also Categories.
PhoneLog Pro also supports Spotlight Searching.
The calls can be sorted by who they were made with, when they were made or what priority they had. Use the buttons beneath the search box to change the current sort type and whether to sort ascending (up arrow) or descending (down arrow).
The frontmost log can be saved at anytime by pressing the "Save" button or pressing Command-S. The log files use the extension ".phlgpk" and can be saved anywhere you like (the default location is the Documents folder in your home directory). They have the following icon:
Double-clicking on the file should open it up automatically in PhoneLog Pro. It should remember the position onscreen that it had the last time it was used.
Choose Print from the File menu, or press Command-P. You will be asked whether you want to print all calls or just the selected calls. You can press A for all calls or Return for just the selected calls.
You can drag calls from one PhoneLog Pro call list to another. So if you have two call logs open you can transfer calls between them. You can also cut and paste calls between logs.
If you drag calls into a document from another application that accepts plain text or rich text input, then all the details about the call will be copied to the other application. TextEdit or Pages are good applications to try this with.
You can also drag a call onto the Mail icon in the Dock and a new email will be drafted with the contents of the call — great for quickly sending call information to someone else who doesn't have PhoneLog.
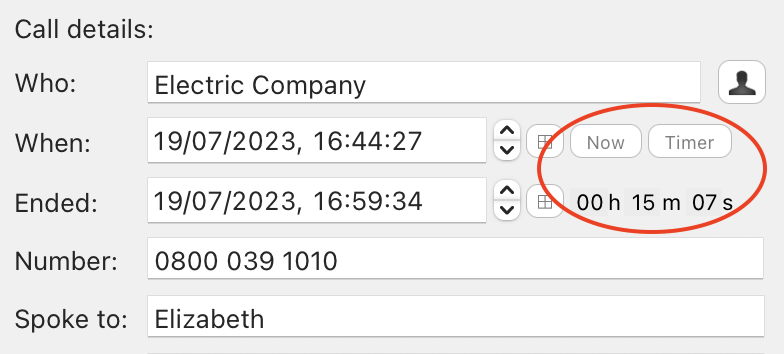
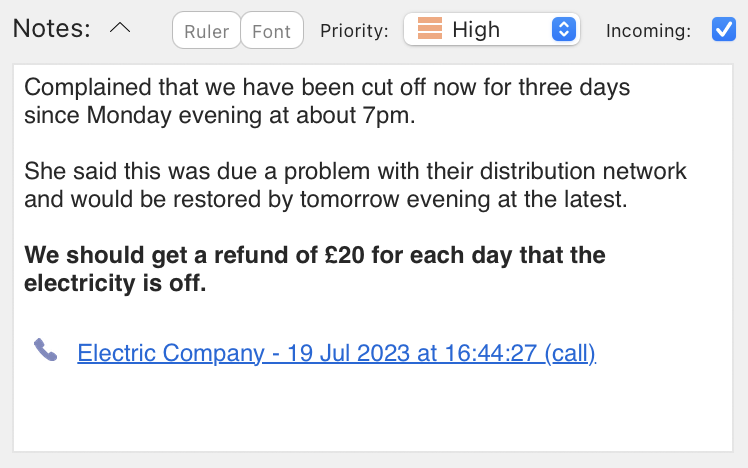
Press the timer button to start the timer ticking when you make a call — press it again as the call ends. The "Ended" date/time field and the duration fields are automatically calculated.
Normally if the timer hasn't been used the Ended time field is not displayed. You can use the Preferences window to ensure that the Ended field is always displayed even when there has been no duration recorded for the call.
While the timer is running the duration is displayed in blue and you are free to go to any other call and edit or view the details. The timer stops when you quit PhoneLog Pro or you go back to the call that was being timed and press the End button.
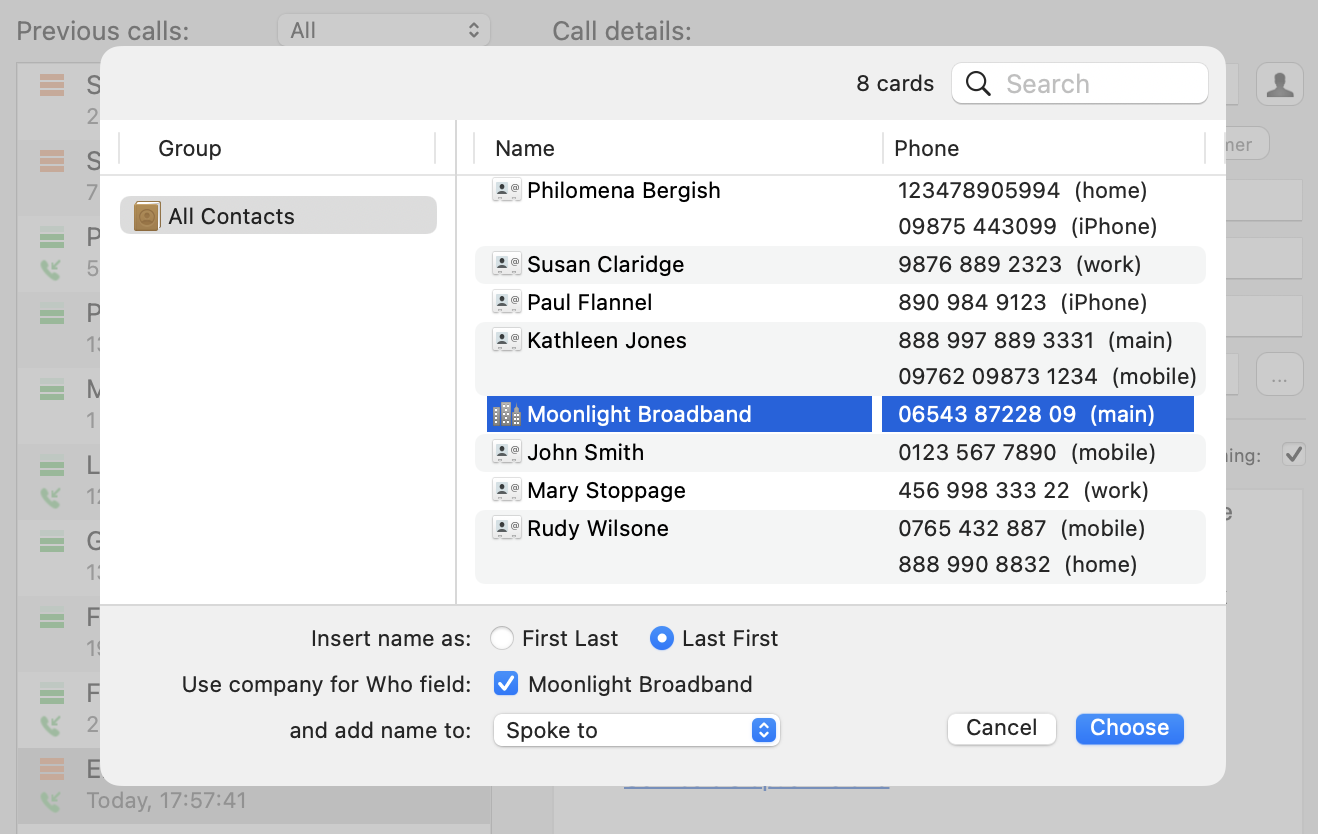
Click on the person icon beside the Who field and PhoneLog Pro displays a window filled with all your contacts and groups from your address book. Just choose the one you want and it will fill in the fields automatically.
If you have stored a company name with the contact in the address book you can choose to put the company name in the Who field and the name of the contact in another field — usually the SpokeTo field.
PhoneLog Pro makes it convenient to record when you first made a call and also to set tasks to remind you to make follow up calls.
|
|
Use the Calendar event button to add an event to the Calendar app so you can have a record of when the call was made. |
|
|
Use the Reminders button to add a task to the Reminders app so you can be reminded to make a follow up call. |
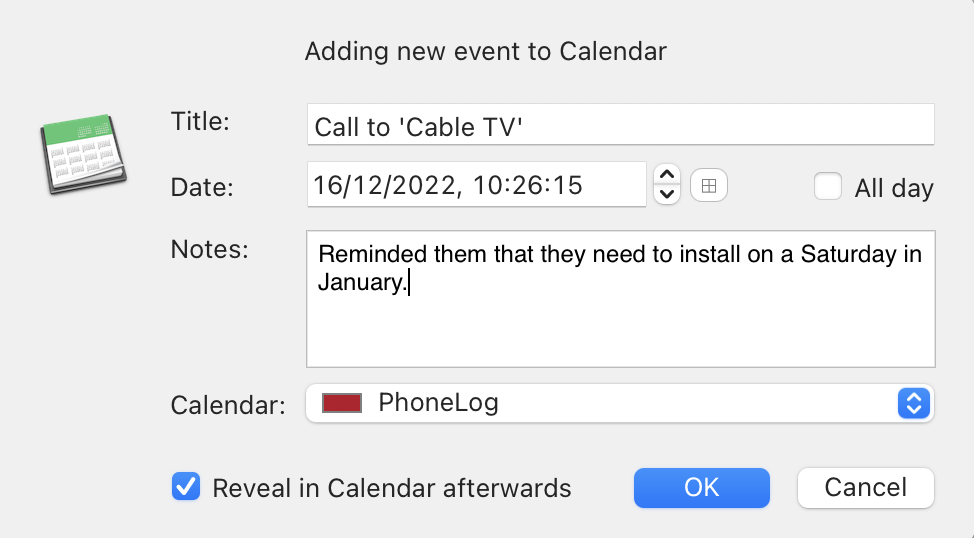
After clicking on the Calendar Event button underneath the notes field a dialog box appears to gather more information. It will be pre-populated with information in the title or notes fields depending on how you have configured PhoneLog Pro — see the Preferences window. You can change the notes for the event or change the date or time. By default the Calendar app will open up afterwards to show you the newly-added event. You can uncheck the box to prevent this.
The events can appear separately in their own PhoneLog calendar or in any existing calendar you like — just choose from the dropdown menu.
PhoneLog Pro embeds a URL link in the event details in Calendar. Clicking on this link will open PhoneLog Pro and display the associated call.

Adding tasks to the Reminders app is very similar to adding events but you have a few more options. You can specify whether the task is completed already and you can specify a due date for a reminder. This is very useful to remind you of follow up calls you have to make.
You cannot add both tasks and events to the same iCloud calendar, so by default PhoneLog Pro uses a calendar called "PhoneLog" for events and one called "PhoneLog-Reminders" for tasks.
If you don't already have a calendar called "PhoneLog", PhoneLog Pro will automatically create one the first time you use it to add an event or task. This will be a local calendar in Calendar or Reminders (one that appears as "On My Mac") and it won't automatically sync to your iCloud account.
If you would like the events or tasks to appear in a calendar that does sync with iCloud then make sure you have iCloud set up properly on your Mac and then create a calendar yourself in Calendar using the "File | New Calendar" menu and choose your iCloud account (or "File | New List" in the Reminders app). You can call it anything you like and then choose it from the dropdown menu when adding events or tasks in PhoneLog Pro. If you call it "PhoneLog" then PhoneLog Pro will use it as the default when adding new Tasks and Events.
This procedure also works with other CalDAV calendar accounts.
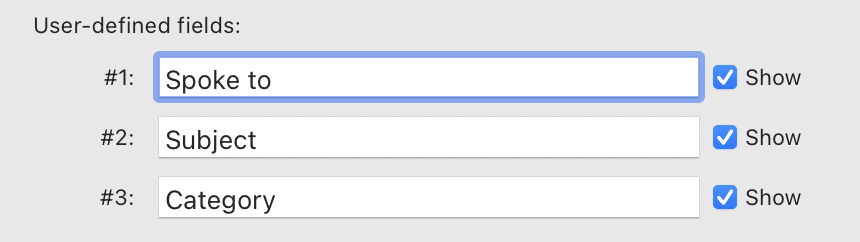
Use the Preferences window to change the names of certain fields and even to make them visible or not. You might want to change "Subject" to "Reference" or something else more relevant to you, or you might simply want to hide the "Spoke to" field.
Press the "..." button to the right of the Category field for a list of the categories for this log:
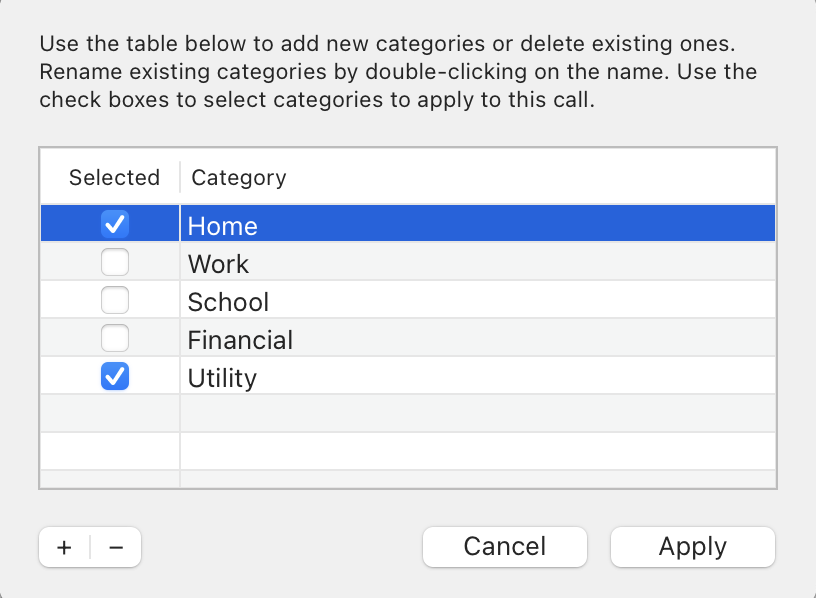
Use this window to add, rename or delete categories. Use the check boxes on the left to specify which categories are selected for the particular call being edited. Each call log can use a different category list.
You can also enter categories for a particular call by typing directly into the Category field. It will only allow you to enter valid categories that haven't already been entered.
Some calls are more important than others. You can give the call one of three levels of priority — High, Normal or Low.
Tick the Incoming checkbox when you are recording details about a call you received, rather than a call you were making. Icons in the call list allow to easily see which calls are high priority or which are incoming rather than outgoing.
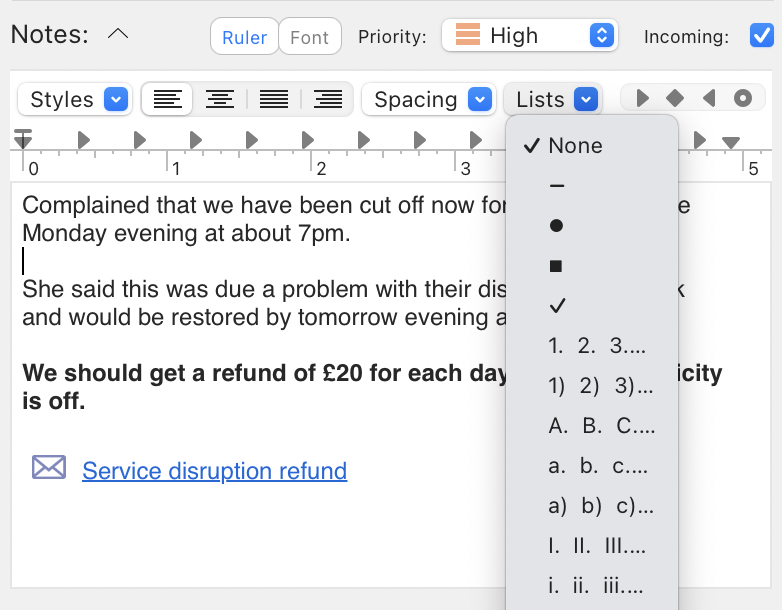
With PhoneLog Pro you're not limited to keeping notes in the same default font. You can use "Other" tab in the Preferences window to change the default font for new calls.
You can also use the Ruler and Font buttons to show the ruler and fonts palette, making it easy to add styles, bulleted lists and text in different fonts and colours.
(Please note, rich text notes are not available when syncing a call log between multiple Macs, iPhones or iPads. However, links to files, emails and web pages are supported — see next section.)
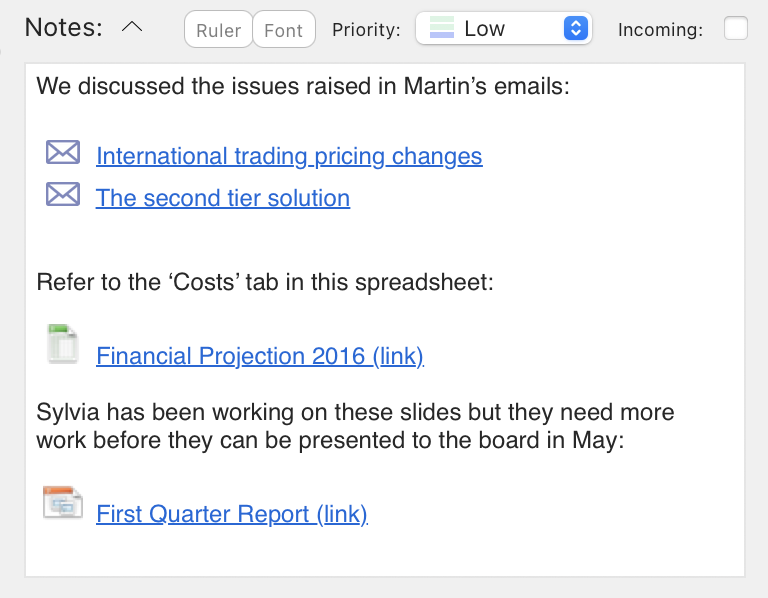
Keep track of things discussed on the call — drag emails from your Mac's Mail app into the notes, or drag files from the Finder. You can also add links to web pages.
The file or email isn't copied into the notes — just a link. So you don't have to worry about the file size of your call log getting out of control. Be careful, though, if you subsequently move or delete a file that you have linked to, then the link may no longer work. PhoneLog Pro will usually find a file if you have moved it somewhere else on the same drive, but if you move it to another drive or network volume it may not find it. Hovering with the mouse over a link will show you where the app is expecting to find the file.
You can make links between calls by dragging a call from the call list onto the notes field of another call. This will create a call link like this:
Clicking on this link will then open the linked call. It's a great way to link together calls that are in some way connected. The calls don't have to be in the same call log either — you can connect calls across different logs.
You can also use this technique to create links back into a particular call from other apps too, like TextEdit or Notes. PhoneLog Pro will launch when you click the link in the other app, open the relevant call log and then jump to the right call.
You can use the Copy Call Link item from the Edit menu to do the same thing. Just paste it into the notes of the call you want to link from, or into another app like Notes.
To make viewing and adding long notes easier, you can use the zoom notes button (up arrow) to increase the size of the notes area. Use the unzoom button (down arrow) to reset the size to normal.
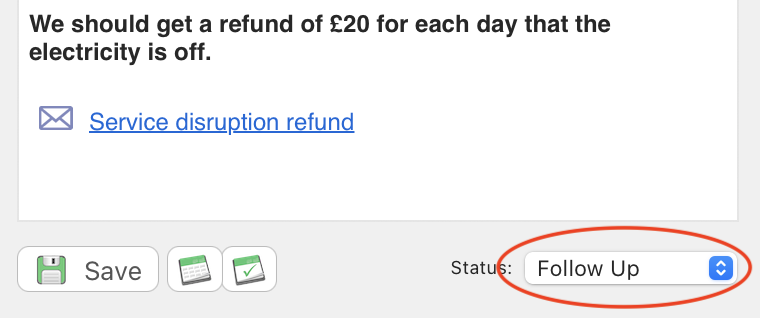
You can assign a status to each call so that you can keep track of those that have been completed, need follow-up, waiting reply etc. Use the drop-down list in the bottom right of the window.
The list of statuses can be changed by choosing 'Customize' at the bottom of the list, or going to the "Other" tab in the Preferences window. You can't change the New or Archived statuses as they have a special meaning. 'New' is the status given to calls that you have just added to PhoneLog and not assigned a status to yet; choose 'Archived' if you have finished with a call and don't anticipate having to deal with it again.
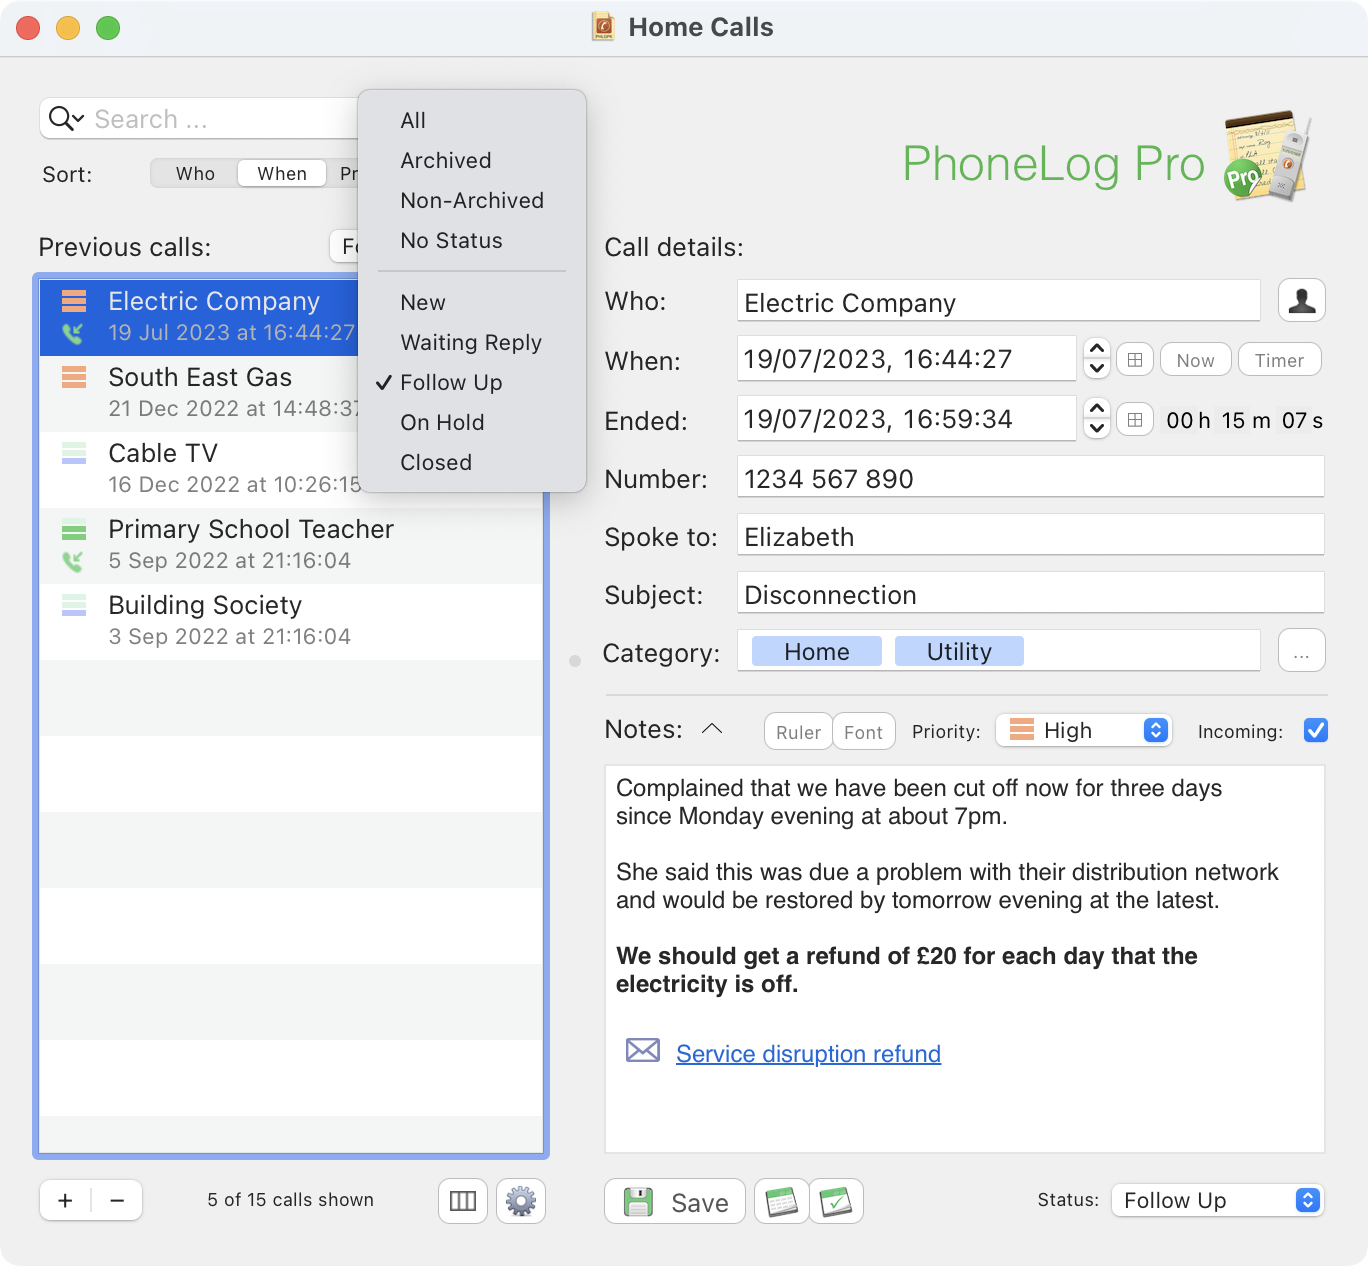
Use the status filter drop-down located at the top right of the previous call list to restrict the calls that are displayed to those with a particular status. Eg, you can choose to show only calls for which you need to ring people back, by choosing to filter for the 'Follow-up' status.
The appearance of some text beneath the call list will remind you that you are only seeing a subset of the calls eg, "7 of 202 calls shown".
When you assign the Archived status to a call, it becomes greyed out in the previous calls list. You can then use the status filter dropdown to show only archived calls or non-archived calls. This is useful when you are finally finished with a particular call and no longer want it cluttering up the call list. The details of the call are easily displayed by choosing to see the archived calls, but you can hide them day-to-day while you use PhoneLog by using 'Non-Archived' in the status filter.
Periodically you should move archived calls into a separate call log by dragging and dropping them so that the size of your call log doesn't grow too big. In future versions of the app this process may be automated.
As well as providing the standard searching within a particular call log — see Searching — PhoneLog Pro also allows you to use the system-wide spotlight search engine built into the Mac.
Just type what you are looking for into the Spotlight search bar at the top right of your Mac menubar. If any call logs contain the text you are looking for they will appear in the list.
Simply choose the one you want and PhoneLog Pro will open it and jump straight to the calls that contain the text you searched for.
There's no need to repeatedly enter the same information into PhoneLog Pro.
When typing into a field the autocomplete feature will prompt you with suggested completions that you have used before in the same field — saving you time & effort.
This feature can be turned on or off in the Preferences window.
If you have many different calls to the same person or company and would like to be able to differentiate calls in the call list by using more fields than just the Who field, then you can use the Advanced Call List.
|
|
Press this button (at the bottom of the window, beneath the call list) and the call list switches to display more fields for each call arranged in multiple columns. You can right click on the column headers to choose which columns to display. You can also resize columns and drag them to change their order. |
| You may need to use the slider between the call list and the call details to widen the call list so you can see all the information. PhoneLog Pro will remember these changes so next time you open the call log you are presented with the table as you left it. | |
| When using the Advanced Call list the sort buttons disappear. Sorting is achieved by clicking on the headers for the columns. This works in reverse order, so clicking on Who then Date should give you an order based on Date first, then Who. | |
|
|
Press this button to revert to the standard call list display. |
Choose Export from the File menu to export the call data to either a comma-separated (CSV) or tab-delimited file. These files can be imported into any spreadsheet application so you can chart your call times or do other analysis.
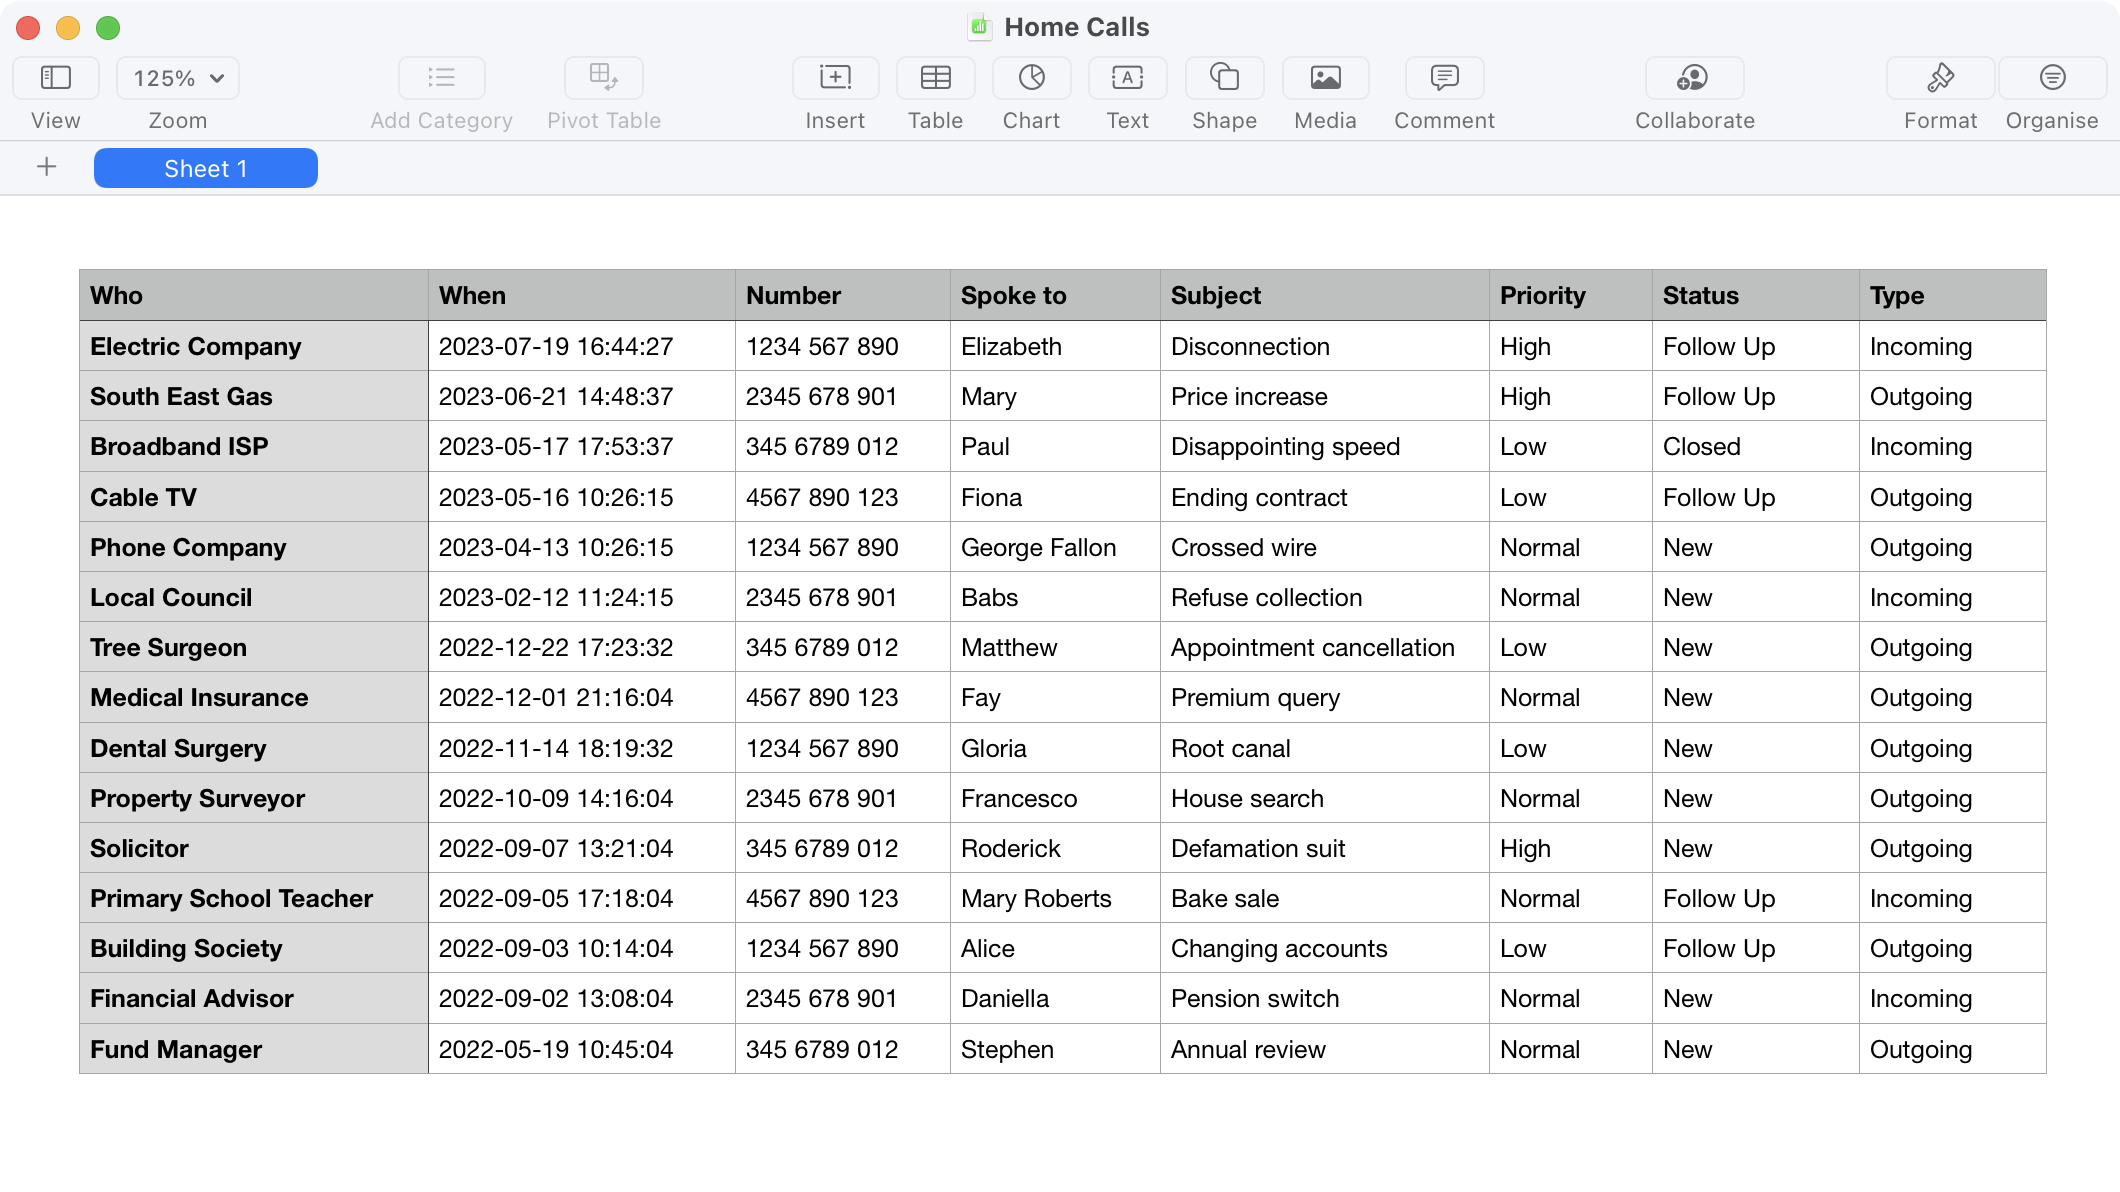
The above screenshot shows how the data looks after being imported into Numbers.
Once you upgrade from PhoneLog to PhoneLog Pro it is expected that you'll probably delete the PhoneLog application and use PhoneLog Pro for recording all your phone call notes. But it is possible to use both simultaneously if you like. Or maybe you have a need to transfer a file to someone else who only has PhoneLog.
Since they both use different file formats and allow different data to be stored for each call you can't simply use the same files with each. However you can transfer data between the two applications:
When you open a PhoneLog file for the first time with PhoneLog Pro it will perform a data migration and leave the old file aside in case you ever need to use it again. Once you are happy that all the data from PhoneLog has been migrated you can delete the old file.
So if you open a file "Utility Calls.phlg", a new file will be created called "Utility Calls.phlgpk" and PhoneLog Pro opens that file and displays it to you. Note that it has been given a new icon and the file extension has been changed so you can distinguish it.
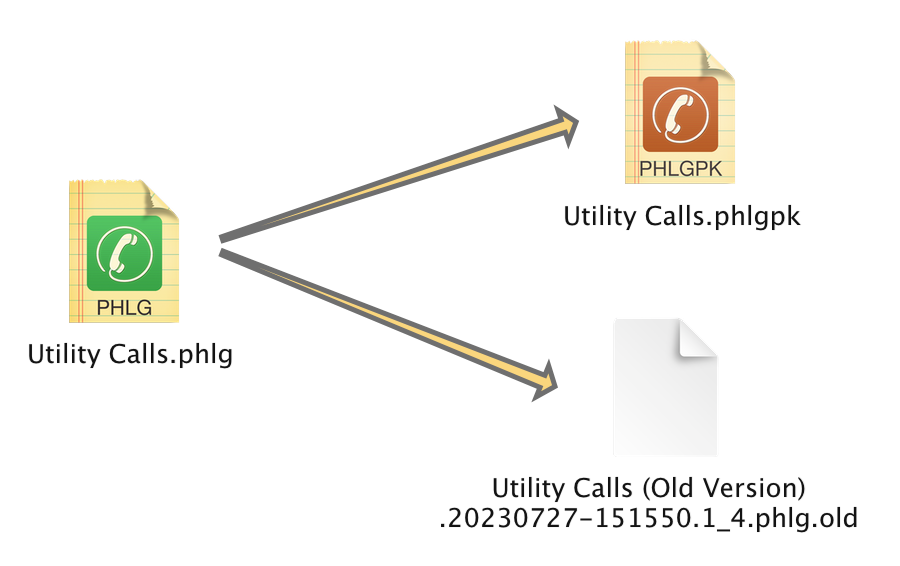
The old PhoneLog file is renamed to something like: "Utility Calls (Old Version).20230727-151550.1_4.phlg.old". (The filename has a timestamp and data model version number in it to help with troubleshooting.) The icon and file extension will change so it can't be accidentally opened with PhoneLog anymore.
If you need to (for whatever reason) open the migrated file again in PhoneLog, then simply change the filename back so it ends in ".phlg" and not ".phlg.old".
Note that depending on your preferences in the Finder, the files may appear without any file extensions. Use the "Get Info" command from the File menu in the Finder to see the full filename.
You can choose Export from the File menu in PhoneLog Pro to export to PhoneLog format. Choose "PHLG - PhoneLog v1.4 (XML)" in the format drop down. Not all the data can be exported so please take note of the warning that is displayed:
The file that is produced by this export operation will be suitable for opening in PhoneLog version 1.4 and later versions (this is the free edition of PhoneLog).
It will not contain all the data that is stored in the currently open PhoneLog Pro document. The only fields that will be exported to PhoneLog are:
Who
When
Number
Spoke To
Notes
The Notes will be a plain text only version: no formatting, nor the links to files or emails can be exported.
If you subsequently reopen this file in PhoneLog Pro, only the above fields will be present.
This export option is provided for compatibility between the two editions of PhoneLog.
To make it easy to work with calls in multiple log files, PhoneLog Pro provides an Open Recent window. It will keep track of up to twenty recently-opened call logs, making it is easy to find them again no matter where they are stored on the Mac.

Select the ones you want to open, hit return and the app will open them all up in separate windows — remembering the screen locations of each.
This recent files window opens automatically when you start the app if you have opened more than one different file in the past. You can change the behaviour so that it will always open with the last log that was used and not this window, by unchecking the box. This window can also be opened at any time by choosing "Open Recent ..." from the File menu.
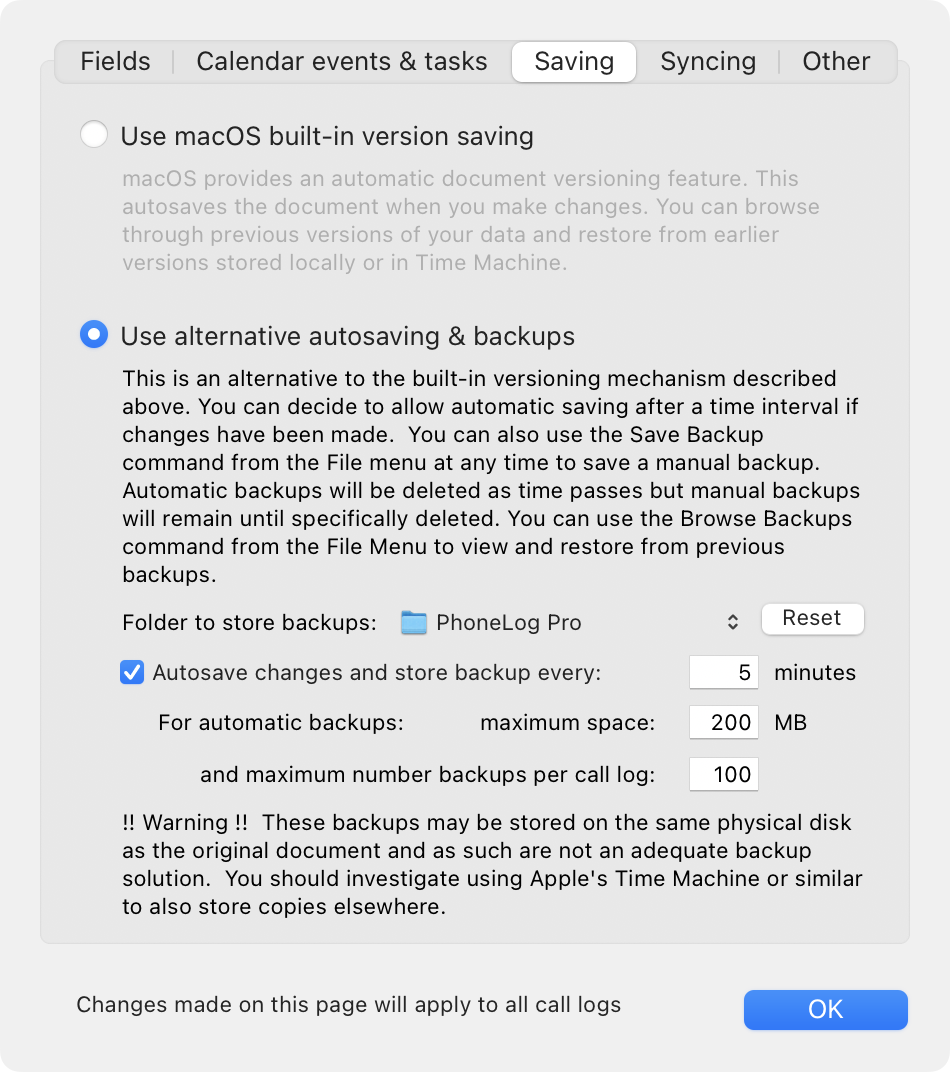
PhoneLog Pro tries to prevent you from losing data, by saving changes you have made automatically at regular intervals. It also stores previous versions of the call log so you can view them later and revert back to an old version if you have made changes that you don't want to keep.
You can use the macOS document versioning system (referred to here as "Versions") that works with Time Machine to allow you to browse through older versions using the familiar "File | Revert To" menu option.
Or you can use PhoneLog Pro's own autosaving and backup system (referred to here as "Backups") which will take a copy of the call log at regular intervals and gradually remove backups as time passes.
Please see the Saving tab in the Preferences to choose which mechanism to use.
When you choose to use the "Backup" mechanism, automatic backups are taken at regular intervals and gradually deleted as time passes. You can also take a manual backup at any time by choosing Save Backup from the File menu.
In the Preferences you can specify how often the backups should be made and limit how much storage space the complete set of backups should take. You can also choose the location of these backup files. By default they are stored in your Application Support folder and you can revert to using that location by using the Reset button. Otherwise you can choose any other folder you have permission to read and write to. You may also choose a folder on a network volume or an external drive for safety.
Use the Browse Backups menu item to view the existing backups:
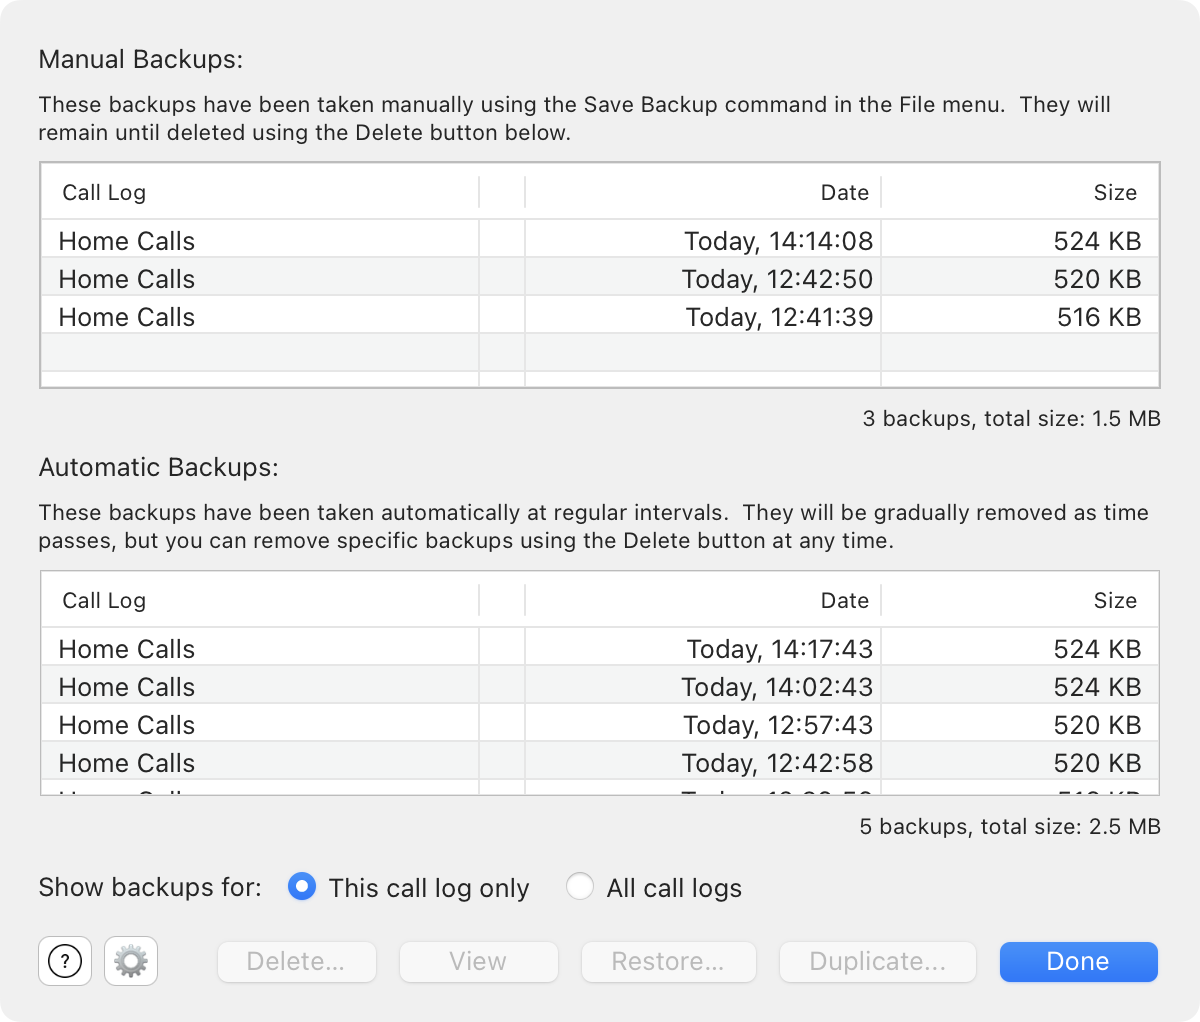
This window shows both the manual and automatic backups for the currently open call log. Choose the "All call logs" option to see the backups that have been taken for all call logs.
Pressing Delete will delete any selected backups.
Pressing View will open a read-only copy of the Call Log as it existed at the time the selected backup was made. You may view multiple backups at once. You can then drag and drop files from the backup to the current call log if you have accidentally deleted something important. You can freely drag and drop or cut and paste calls from any opened backup.
Duplicate allows you to create a new writeable call log from an existing backup. You will be asked for a name and location of where to save it. This is useful if you want to start a new call log with the contents of another call log that it had at a particular time. It is also useful if you have completely deleted a call log by mistake.
Choose Restore if you would like to throw away the current contents of the call log and revert it back to the contents it had at a particular time — after you made a disastrous edit for example.
Note: If you have deleted a particular call log, then the backups will still exist until you delete them. The backups for which an owning call log cannot be found are displayed with an X. Use the Clean up button to delete these.
When you choose the "Versions" mechanism, macOS takes responsibility and saves versions when necessary. The way you access past versions is different depending on which version of macOS you are using, but in recent versions use the Revert To option from the File Menu.
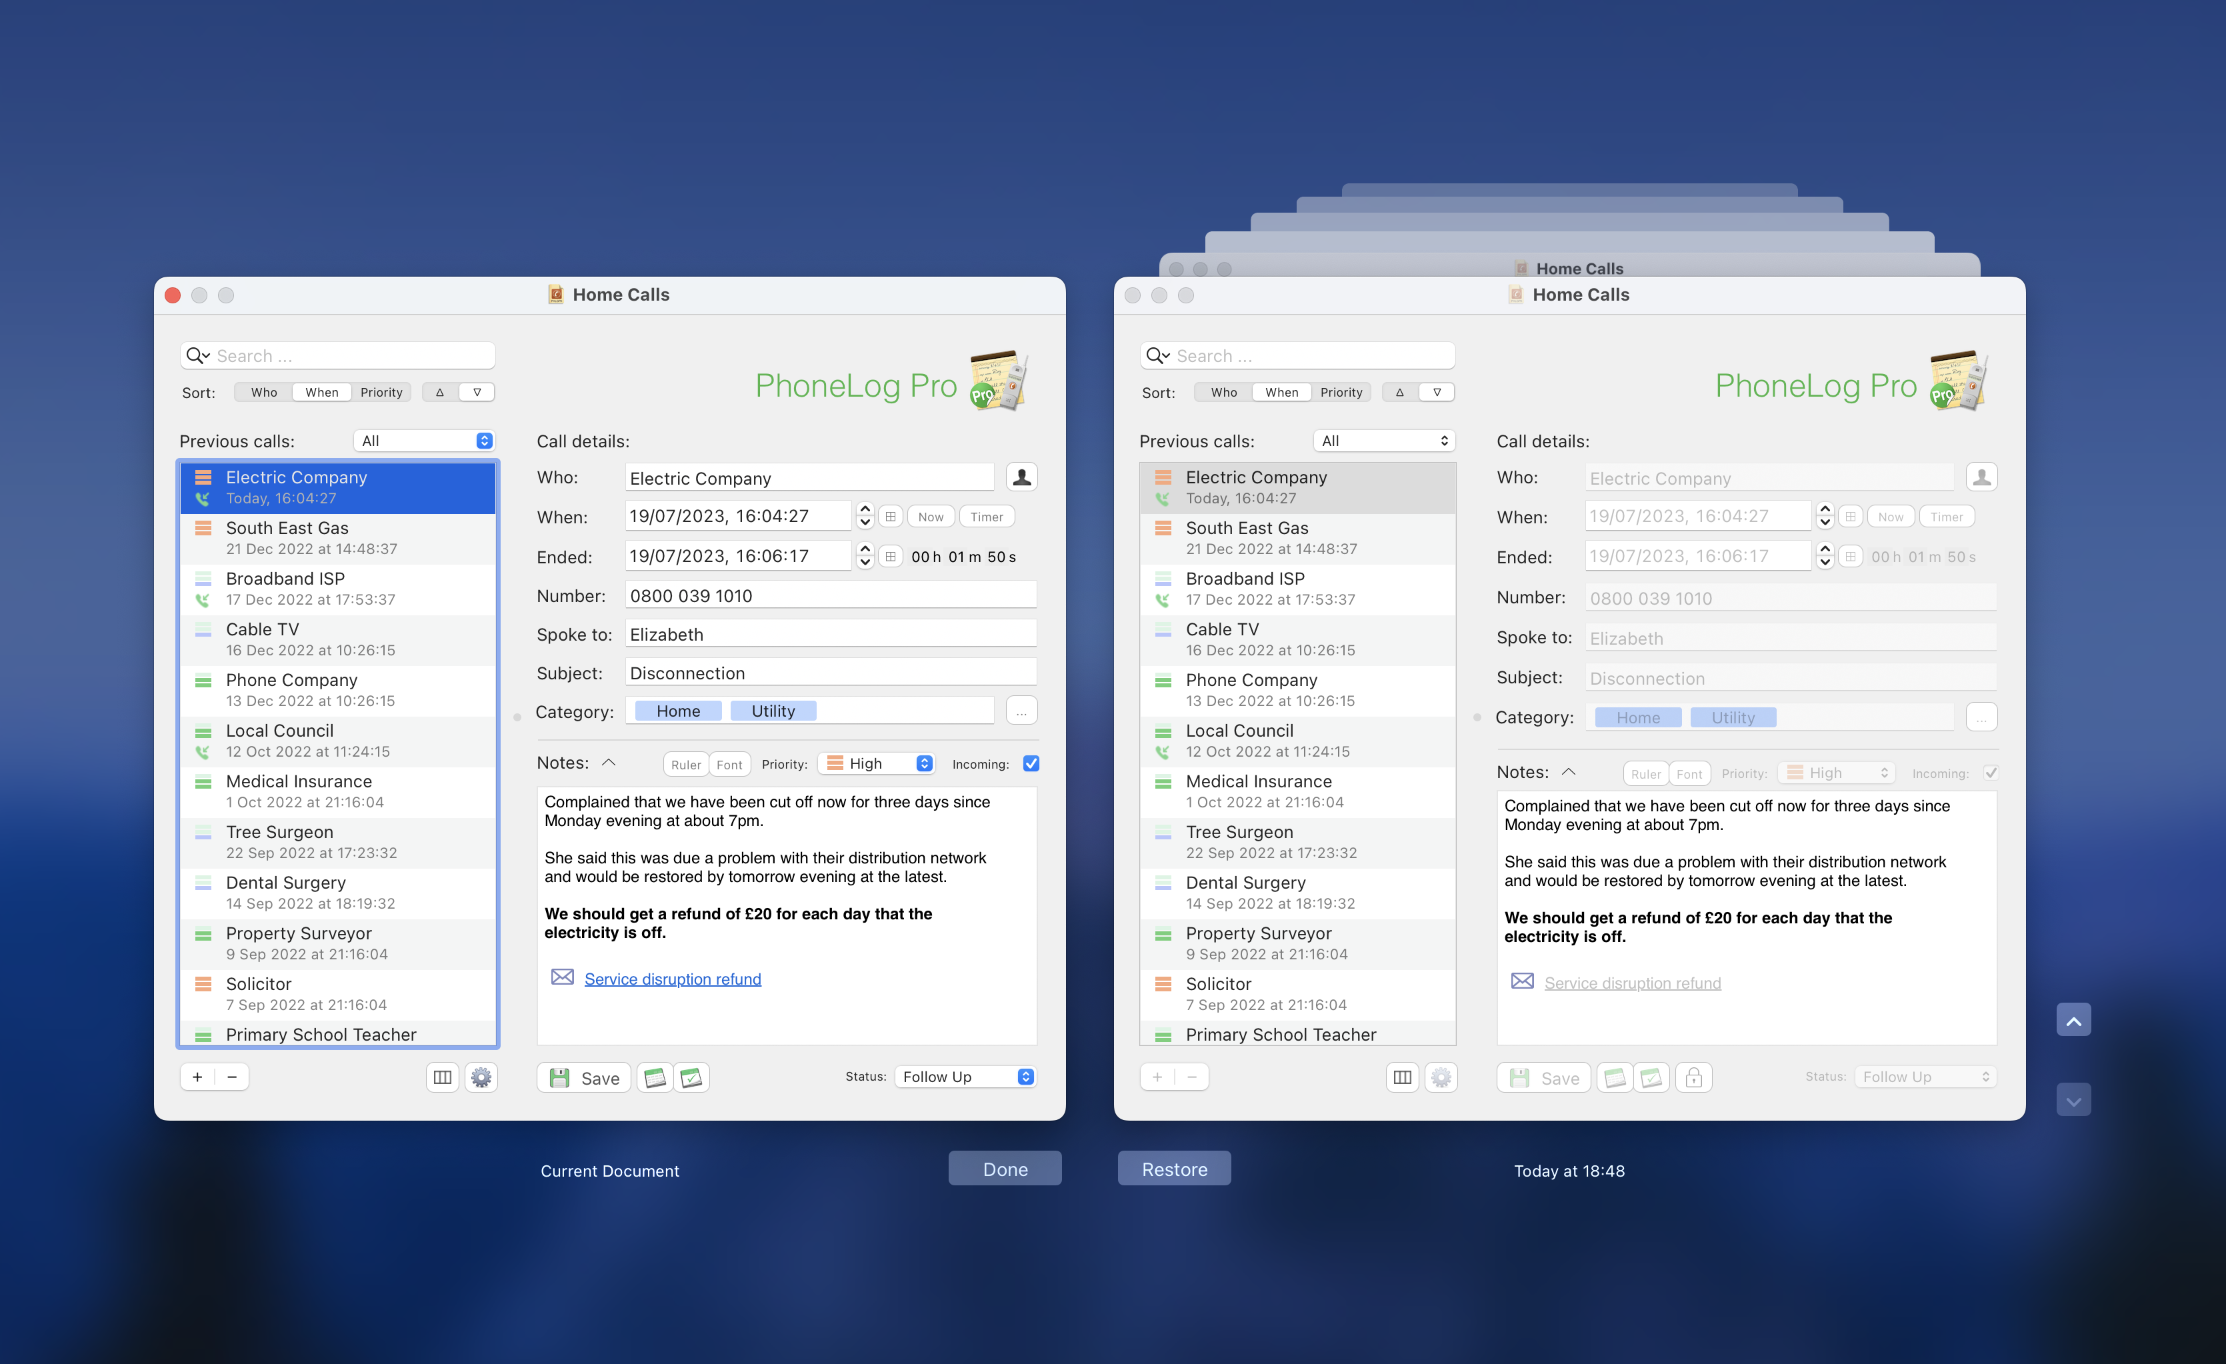
You can view and revert to previous versions of your call log using the familiar Time Machine browser (shown above). Please see the standard Mac help for instructions on how to use Versions and Time Machine.
You may sync call logs between Macs running "PhoneLog Pro" and iPhones or iPads running "PhoneLog", or any combination of the two. There are two methods that you can use:
You can have different call logs syncing using different mechanisms, but a call log can sync using only one method. So if you sync your "Work Calls" call log using Dropbox then it cannot also be synced using a shared folder.
Syncing using Apple's iCloud is not supported at this time, but is a possible future enhancement. Please send a feedback email if you are keen to see this capability implemented.
Syncing a call log between one Mac and another is straightforward:
Any changes you make on either device will be synced between them. Use the Syncing tab in the Preferences to enable or disable automatic syncing and other options.
|
|
Pressing this button (below the notes field) will start a manual sync at any time. If the arrows have a dot in the middle then it means that automatic syncing is turned on, but you can still press it to start a manual sync. When a sync is in progress, the button will show an X — pressing this will cause the sync to stop. |
Please see the Privacy Policy for information on data security when syncing.
For technical reasons there are some limitations and some PhoneLog features that are not available when syncing:
Open the call log you want to sync and choose "Sync using Shared Folder" from the File menu. This will present the following dialog:
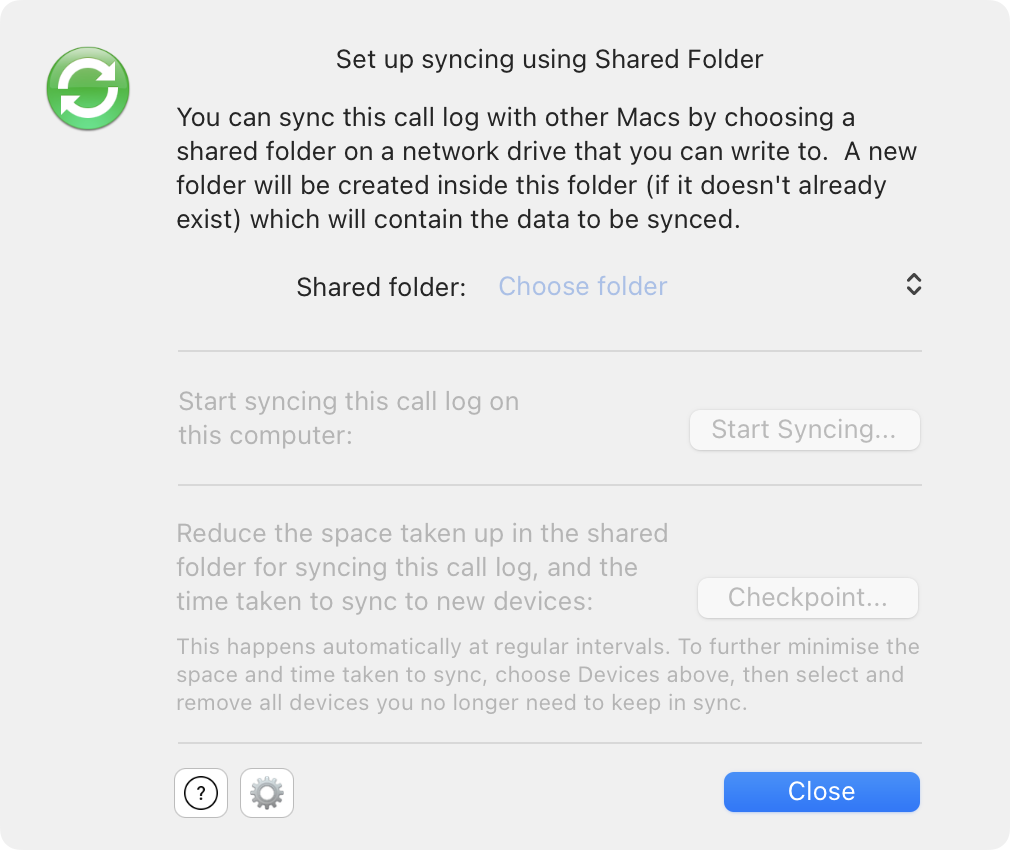
Press Choose Folder and navigate to the shared folder that you want to use for PhoneLog. This can be on a network mounted volume like an AFP or SMB file share. A folder will be created inside this folder called "PhoneLog Sync Transactions". You should not modify this folder or its contents in any way as this may cause irreparable data loss in the call logs that are being synced.
Once you have chosen the folder, press Start Syncing. Please note the warning about rich text notes.
A copy of the original call log is made for your safety and you will now be asked for a location and filename to give it. You can delete this copy later once you are happy that syncing is working as you expect.
The call log will then be moved to a hidden folder inside your Application Support folder so that it cannot be moved or renamed while it is syncing. It will then close and reopen and start the first sync.
The title bar of the call log will now also say "Shared Folder" so you know it is a syncing call log.
Once the first sync has completed you can make changes to the call log as usual. Syncing will take place automatically if the Preferences are set that way, otherwise you can initiate a sync at any time by pressing the sync button (circular arrows) beneath the notes (or press command-R).
Open the call log you want to sync and choose "Sync using Dropbox" from the File menu. This will present the following dialog:
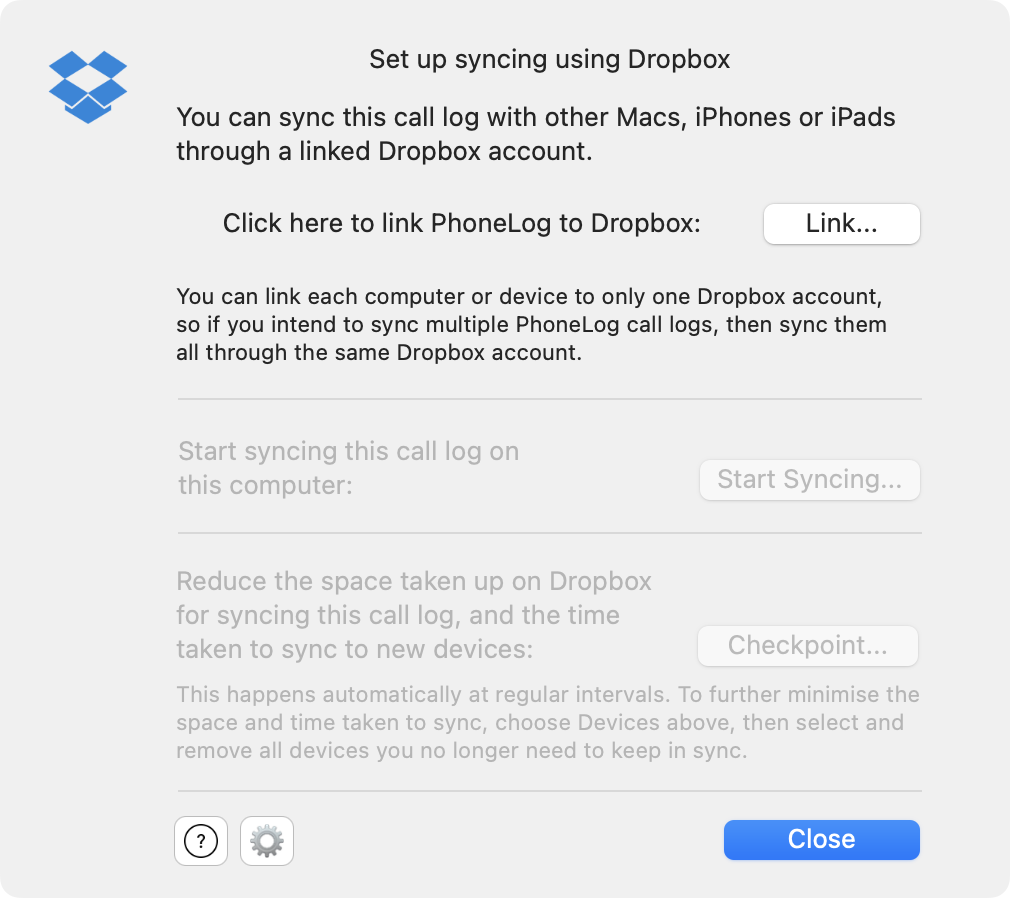
Before you can sync using Dropbox, you need to link to a Dropbox account. If you already have Dropbox on your Mac then you can link to the same account or a different one entirely. This is useful if you want to share call logs between people who you otherwise would not allow access to your Dropbox. You can set up a Dropbox account specifically to sync PhoneLog call logs and link to this one.
Press Link and then follow the instructions. Your browser should open and allow you to link to Dropbox. On switching back to PhoneLog the Start Syncing button should be enabled. If it is not, then quit all apps, restart your Mac and try again.
Once it is linked, press Start Syncing. Please note the warning about rich text notes.
A copy of the original call log is made for your safety and you will now be asked for a location and filename to give it. You can delete this copy later once you are happy that syncing is working as you expect.
The call log will then be moved to a hidden folder inside your Application Support folder so that it cannot be moved or renamed while it is syncing. It will then close and reopen and start the first sync.
The title bar of the call log will now also say "Dropbox" so you know it is a syncing call log.
Once the first sync has completed you can make changes to the call log as usual. Syncing will take place automatically if the Preferences are set that way, otherwise you can initiate a sync at any time by pressing the sync button (circular arrows) beneath the notes (or press command-R).
Once a call log has been set up to sync, it can be opened on another Mac. Use the "Open from Shared Folder" or "Open from Dropbox" options in the File menu and select from the available logs given. If you are syncing using a shared folder then choose the required folder at the top. If you are syncing using Dropbox then you may need to link to the required Dropbox account first.
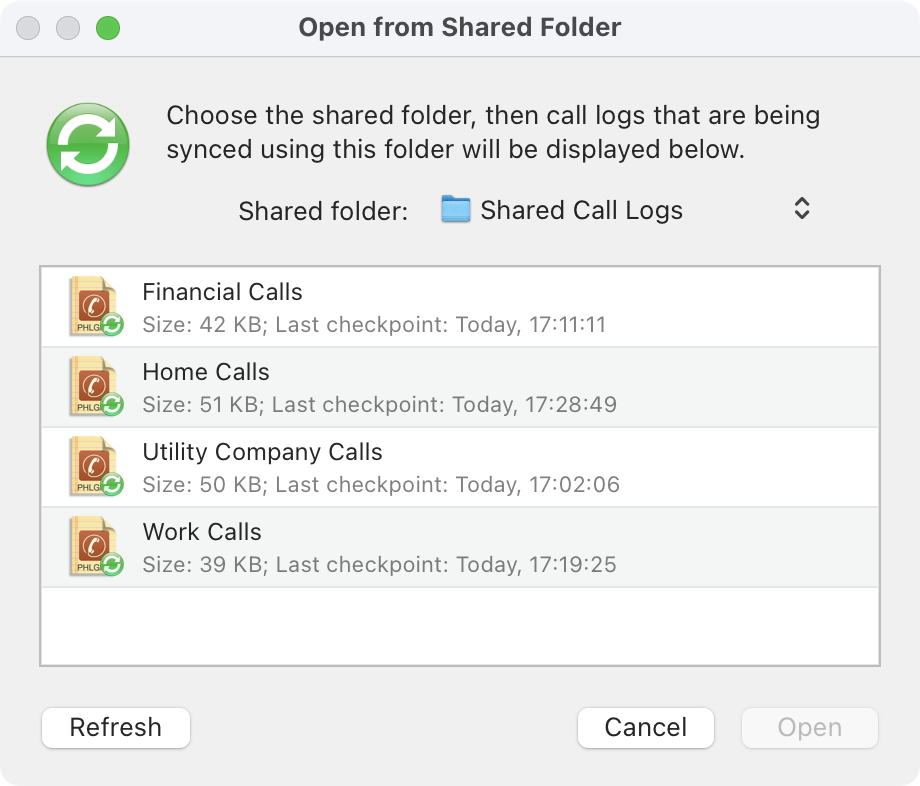
Once you have chosen the log to open allow it to complete its first sync before changing any data. This may take a while depending on how much data has changed since the last checkpoint.
Choosing Sync Settings from the File menu for a call log that has already been set up to sync, will display the following window:
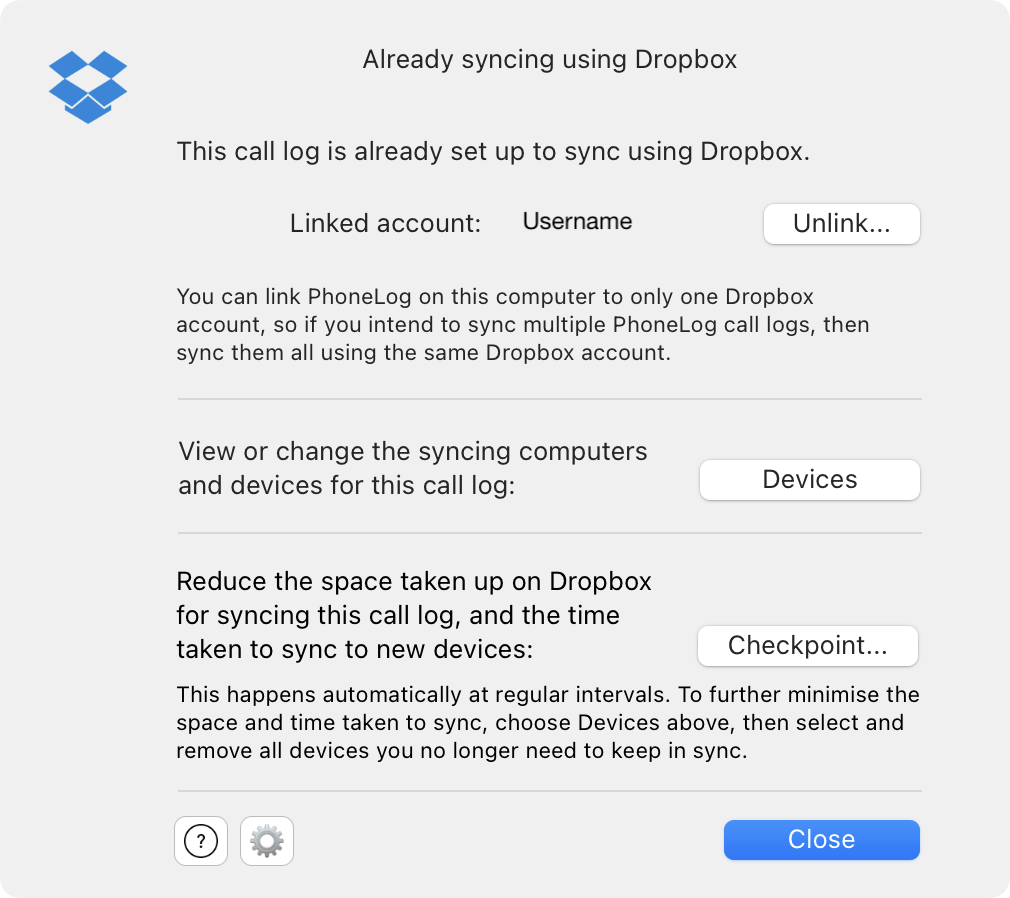
If you wish to stop syncing completely all call logs using Dropbox on this Mac, then you can click on 'Unlink'. Please note: this will delete all call logs currently syncing using Dropbox from your Mac. You should ensure that any changes made to call logs on this Mac that you wish to sync to other Macs or devices, have already made it successfully to the other places. These changes will be lost and are not recoverable if you unlink from Dropbox before you have confirmed this.
If you wish to stop only this call log from syncing but leave the Mac linked with Dropbox, then choose 'Devices' and then 'Stop syncing on this device'.
You can also view or modify the devices that this call log is currently set up to sync with, or force a checkpoint.
Clicking on Devices will display the current Macs, iPhones and iPads that are set up to sync with this call log. For each device, information is displayed showing the time of the last successful sync along with technical information that is useful when troubleshooting.
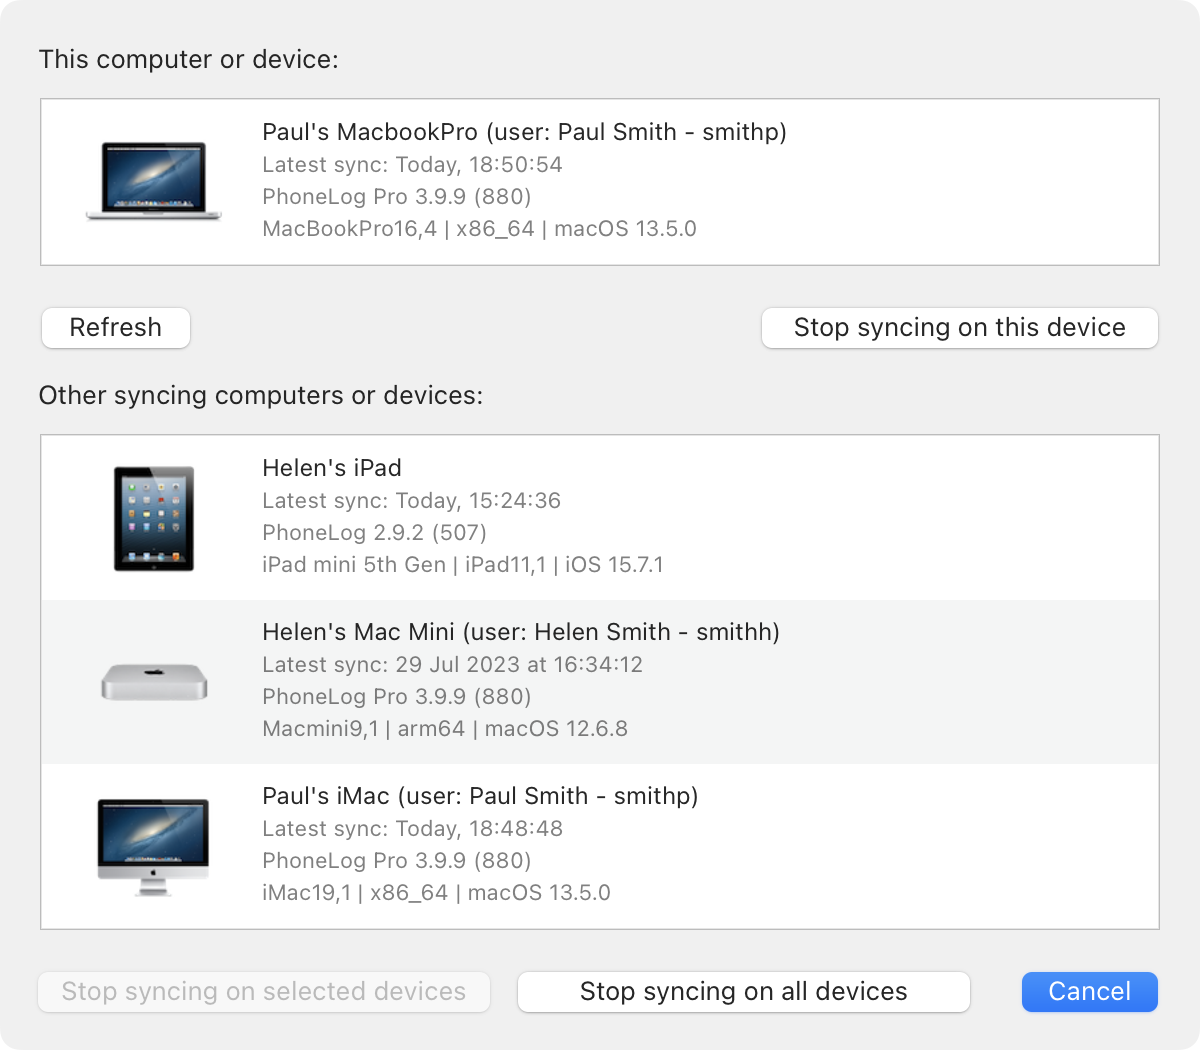
If a particular device has not synced recently then the date will appear in red. You should try to keep all devices relatively up-to-date or else the syncing process will become slow and inefficient, using unnecessary bandwidth and storage space.
Use the relevant buttons to stop syncing on the current device, a selection of devices, or all devices. Before syncing is stopped, you will be asked to save the call log somewhere else so you have a backup copy of it.
An operation called a "Checkpoint" is made at regular intervals automatically. This reduces the space taken on the shared folder or in your Dropbox account to store the data that needs to be synced to other devices. It also reduces the time and bandwidth taken to sync, especially when you open a syncing call log for the first time on a new device.
You can use the Checkpoint button to force a checkpoint at any time manually. This is useful if you know you are about to open a call log for the first time on another device and there have been lots of unsynced changes. But most of the time you do not need to worry about checkpoints — they happen in the background automatically.
Note: While a checkpoint is in progress, you cannot open the call log for the first time on another device using the "Open from Shared folder" or "Open from Dropbox" menu items. Wait until the checkpoint has finished. You also cannot force a checkpoint from two different devices at the same time.
When you change the same piece of data on two different devices at the same time, or before the changes have had a chance to sync between devices, then conflicts may occur. PhoneLog resolves these conflicts automatically but sometimes it may be impossible to determine what you really meant. In this case you may be presented with a dialog box like the following:
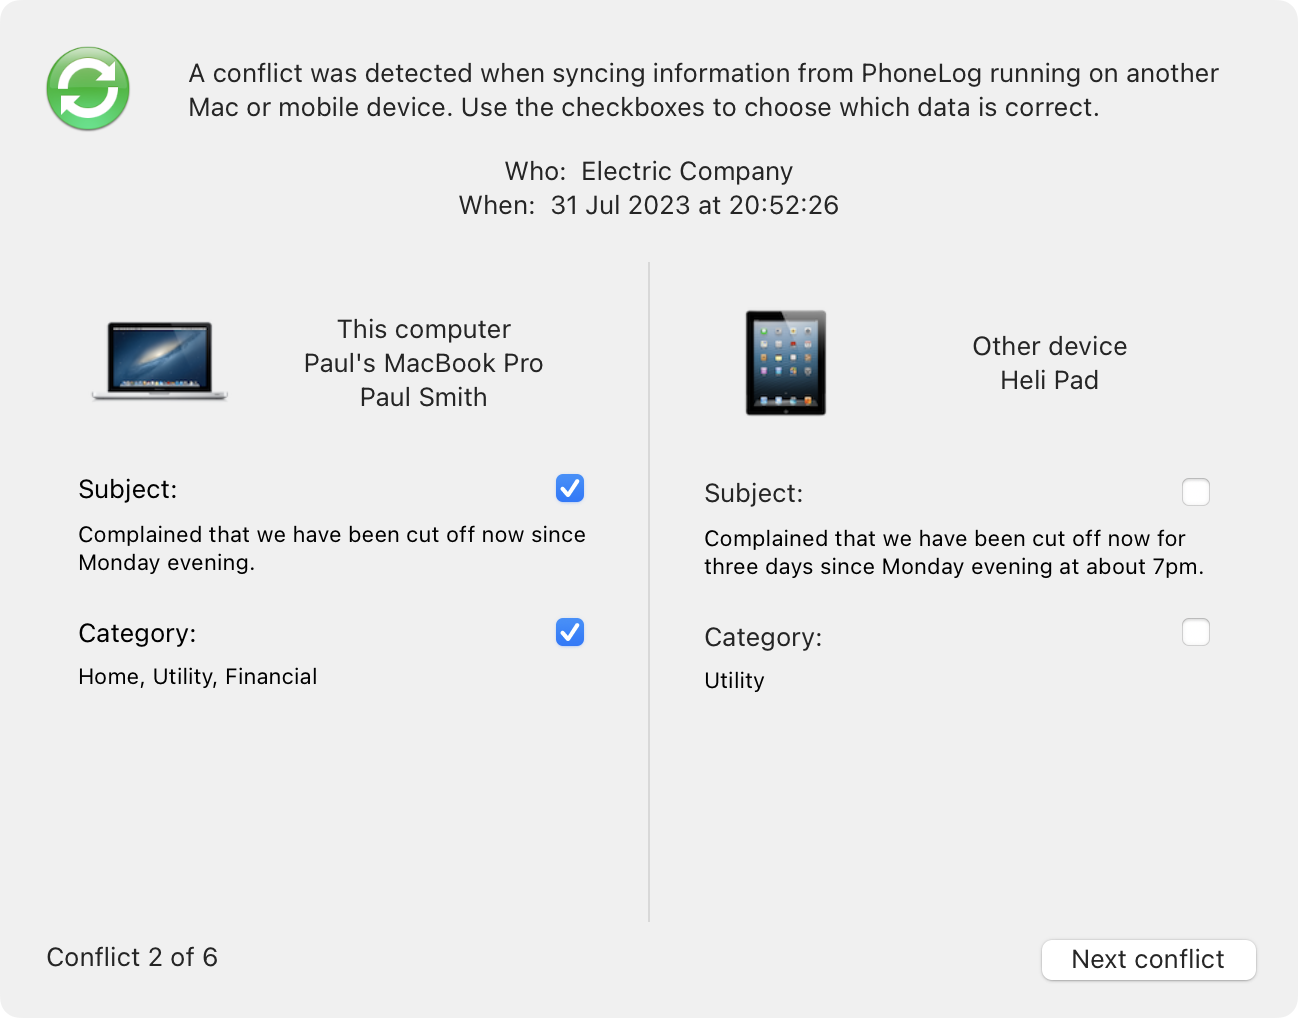
Use the checkboxes to choose which data is correct and go through each page until all the conflicts have been resolved. In the case of a conflict involving the notes field, you may edit the text and cut and paste between each version.
To keep the syncing operation as efficient as possible, there are a number of things that you can do:
Syncing data between devices is not a straightforward task. In rare circumstances, you may experience situations where data is not appearing correctly at another device. In which case the following tips may be useful:
There are various preferences that you can change in PhoneLog. Each call log can have the preferences set differently.
|
|
Pressing this button (at the bottom of the window, beneath the call list), or choosing Preferences from the PhoneLog Pro menu will display the following window with five different tabs: |
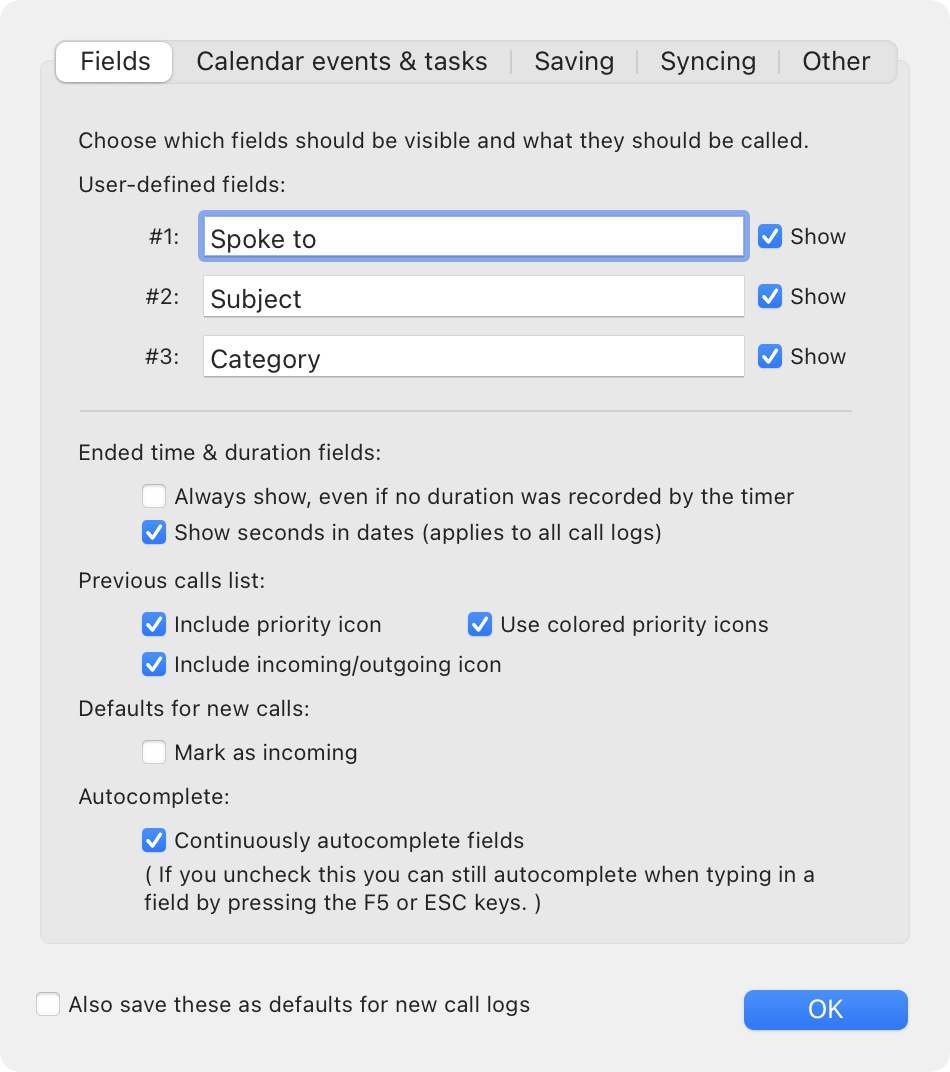
Use the first tab to change the names of certain fields and control whether they are visible; change the way calls are displayed in the call list; and control whether autocomplete is continuous as you type or only invoked when you press F5 or ESC.
Use the checkbox at the bottom to make sure that these preferences are applied to any new call logs that you may create in the future.

This tab allows you to set defaults for new events and tasks for the Calendar and Reminders apps. You can set the templates for the title and notes fields so that it automatically uses the values of fields from the call so you don't have to retype the information. You can also set the default number of days from the call date for which a task will be set.
Choose from the two drop down calendar lists for the default calendar that will be chosen for new tasks and events. Remember, you cannot add events and tasks to the same calendar.
PhoneLog Pro tries to prevent you from losing data, by saving changes you have made automatically at regular intervals. It also stores previous versions of the call log so you can view them later and revert back to an old version if you have made changes that you don't want to keep. Please see the section on Backups & Versions.
You can use the macOS document versioning system (referred to here as "Versions") that works with Time Machine to allow you to browse through older versions using the familiar "File | Revert To" menu option.
Or you can use PhoneLog Pro's own autosaving and backup system (referred to here as "Backups") which will take a copy of the call log at regular intervals and gradually remove backups as time passes.
Use this preferences tab to control which backup mechanism to use. If you choose to use backups, then you can specify how often the backups should be made and limit how much storage space the complete set of backups should take.
You can also choose the location of these backup files. By default they are stored in your Application Support folder and you can revert to using that location by using the Reset button. Otherwise you can choose any other folder you have permission to read and write to. You may also choose a folder on a network volume or an external drive for safety.
Please take heed of the warning on this screen:
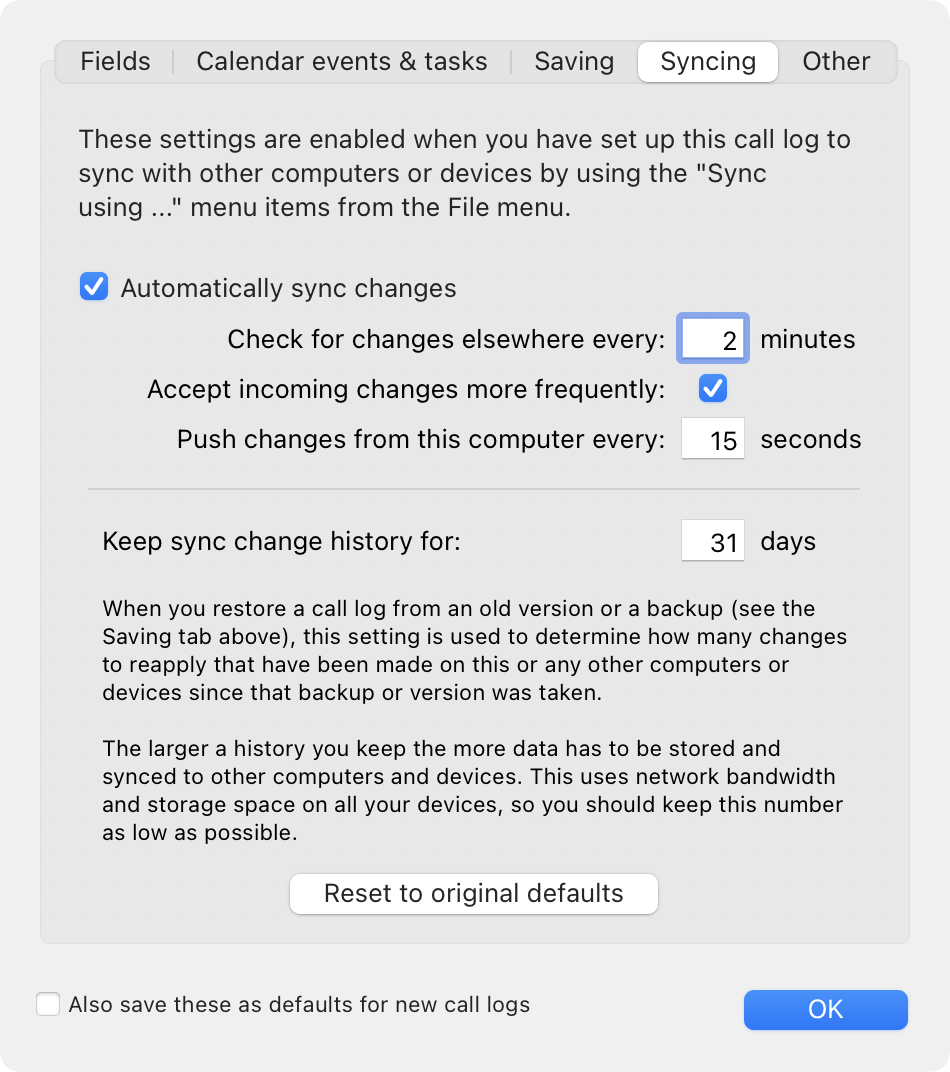
When you have setup a call log for syncing between Macs, iPhones or iPads, see the section on Syncing, you can use this preferences tab to specify whether that syncing should occur automatically at regular intervals or manually.
You can also specify how many days of the sync change history to keep. When you restore a call log from an old version or a backup (see the Saving tab above), this setting is used to determine how many changes to reapply that have been made on this or any other computers or devices since that backup or version was taken.
The larger a history you keep the more data has to be stored and synced to other computers and devices. This uses network bandwidth and storage space on all your devices, so you should keep this number as low as possible.
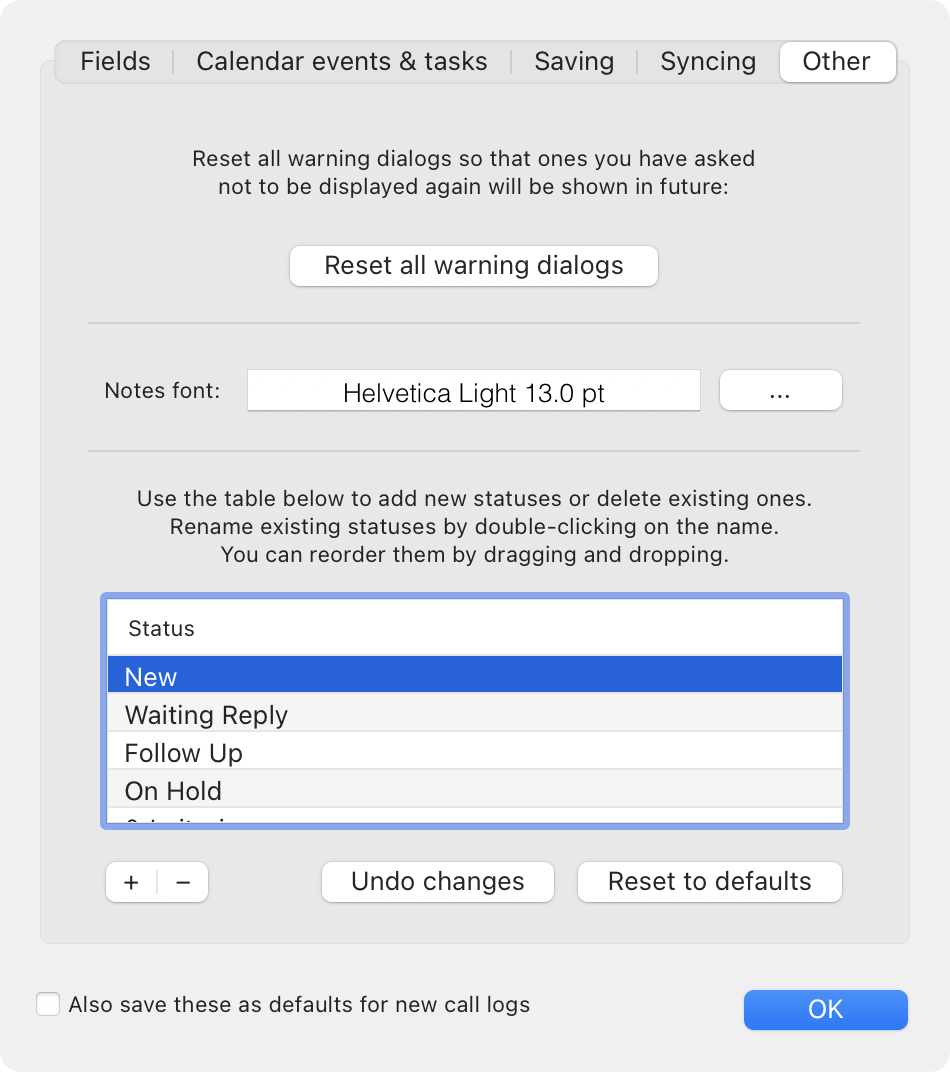
Use this tab for various other preferences, eg to specify the default font and size for new calls.
You can also make changes to the list of call statuses such as Follow Up, On Hold etc.
Most of the standard keyboard shortcuts work as expected, including the following:
| Command-N | Create a new call. |
| Command-Shift-N | Create a new call log. |
| Backspace | Delete currently selected call(s). |
| Command-D | Duplicate the selected calls. |
| Command-S | Save the log. |
| Command-P | Print the log (all or selected calls). |
| Command-W | Close the frontmost log window. |
| Command-Q | Close all open logs and quit the application. |
The Terms & Conditions for accessing our website are described here.
The Terms & Conditions for using our apps and any associated hosted services are described here.
Our formal privacy policy is detailed here.
A less formal description of how we use, store and transfer your data in the context of PhoneLog is given below.
We, Spelga Software Limited (the company that writes PhoneLog, PhoneLog Pro and PhoneLog for iPhone & iPad), collect a minimum of data when you use the apps. Note that any information you enter into the apps, such as call recipients or call notes, is not transmitted to or stored by us. It remains on the device unless you choose to sync it to another device - see below.
We collect a small amount of anonymous usage data so that we can see what features are being used to help us develop the product in the right direction. We also collect a small amount of anonymous data when the app crashes so we can debug and fix any issues.
The apps use either Microsoft's App Center or Google's Crashlytics to record details when they crash or have a serious error. We keep track of this so that we can debug why the app is having difficulties.
So that PhoneLog can make your life easier when you are entering calls, there is a button to allow you to select a name and phone number from your address book without you having to re-type it. No information about your contacts is transmitted to or stored by us. When you start the app you may get a message requesting that you provide access to your contacts. If you decline, then this facility will not work but the rest of the app will behave normally.
You can use PhoneLog to add entries into your Calendar or Reminders list, to record when you made a call or remind you to make a follow-up call. No information about your calendar appointments or reminders is transmitted to or stored by us. When you start the app you may get a message requesting that you provide access to your Reminders or Calendar. If you decline, then this facility will not work but the rest of the app will behave normally.
The following section describes how PhoneLog stores your data and transmits it between devices (in the case of call logs that you have setup to sync):
The data you enter into PhoneLog is stored in a "Call Log" which is a file to which you give a filename when you first save or create it. On the Mac you also choose which folder to save it in, but on iPhones and iPads it will be saved in the Documents folder belonging to the app. No attempt is made to obfuscate or encrypt this data. Other people who have access to the file on whatever device you save it to may be able to open it and have access to the data inside it. If they do not have access to the PhoneLog application they may still be able to open this file using another application such as a file editor and extract your call data from it.
When you setup a call log to sync, then the call log is first moved from the location you originally saved it to, to a hidden folder within your Application Support folder. This is so the file is not accidentally moved, renamed or deleted. When it syncs, call data leaves your computer or device and is transmitted to other computers and devices. When it arrives at those other devices the data is saved in the same way as described above for non-syncing call logs.
If you choose to sync the call log using a shared folder, then the data is also stored on the shared folder that you choose. Similarly, if you choose to sync using Dropbox then the data is transmitted to the account you link with at Dropbox where it is stored in an app-specific subfolder called '/Apps/PhoneLog-SpelgaSoftware'. The data could be accessible by a third party at these locations if you have set up either the shared folder or your Dropbox account permissions to allow this.
To reduce the potential for leakage of your call data when syncing, PhoneLog encrypts your call data and only stores an encrypted version on Dropbox. This should defeat casual observers, but will not defeat a determined hacker such as a large well-funded organisation. Some data such as the user's name, device name, device identifier and IP address of the syncing computer or device is not encrypted when it is stored at these locations, but the contents of the call log is.
In certain circumstances, to reduce syncing times, data is transmitted directly between two computers or devices on the same Local Area Network (LAN). In this case the call data is encrypted in the same fashion as described above.
No data is transmitted to Spelga Software — the syncing is performed using either the shared folder you specify or Dropbox's servers.
PhoneLog may be set up to store automatic or manual backups of your call logs to avoid accidental data loss (please see Backups & Versions).
On all iPhones and iPads, or on Macs if you are using the "Backup" mechanism, please note that when you delete a call log the backups are not automatically deleted too. In this case use the "Clean up" button to delete backups for which no owning call log can be found.
If you have a problem with PhoneLog or a suggestion for making it better, and reading the documentation hasn't helped,
then please feel free to send an email to
spelgasoftware [at] gmail [dot] com
and we'll do our best to help. Please include the version number of PhoneLog Pro that you are using - this can be found
by choosing "About PhoneLog Pro" in the PhoneLog Pro menu.
The application support page is:
PhoneLog is Copyright © 2011-2026 Spelga Software Limited. All Rights Reserved.
Significant contributions were made by a number of people and open source projects in developing this suite of apps. Please see the Acknowledgements section of the About Box for more details.